Rice Pilaf

Rice pilaf seems very 90s to me, but it’s a delicious and v. easy side to make for dinner!

IMG_7272.JPG

Recipe Type: Quick and Easy, Side Dish

Time: 30-40 minutes

Servings: 4

Ingredients

1 ½ cup of long-grained rice

½ cup diced onion (about half a medium onion)

Two minced garlic cloves

2 ½ cups of water, chicken, or vegetable stock

If using water you’ll need one teaspoon of chicken bouillon or one teaspoon of vegan dashi powder

One sprig of thyme

One bay leaf

Olive oil

Salt & Pepper

Equipment

A small heavy-bottomed pot with a lid

Knife

Cutting board

Instructions

Here’s my recipe for homemade chicken stock.

  • Peel onion and dice into ¼ inch pieces. Peel and mince two garlic cloves and set aside.

  • Heat 2-3 tablespoons of olive oil in a heavy-bottomed pan over medium-high. When the oil is hot, add the dry rice and cook, continually stirring, so it doesn’t burn. Cook the rice for a few minutes until the rice turns translucent, then slightly opaque. The rice should sound like glass beads sliding around the pot.

  • When the rice is glassy, add the onions and garlic to the pot and cook for a minute or until the onion becomes translucent.

  • Add the water or chicken/vegetable stock to the pot and lower the heat so that the rice is barely simmering. If you’re using water, add the bouillon or dashi powder to the pot and stir. Then, add the sprig of thyme, one bay leaf, and a salt to taste. Cover the pot with the lid slightly ajar and cook over low heat until the rice is cooked through and has absorbed the liquid (about 20-30 minutes).

  • When the rice is nearly finished, close the lid and let the rice steam for a five minutes or so before serving. The rice is ready when the grains of rice are fluffy and there is no liquid left in the pot. Fluff with a fork and serve!

Whole Artichoke & Creamy Gochujang Sauce

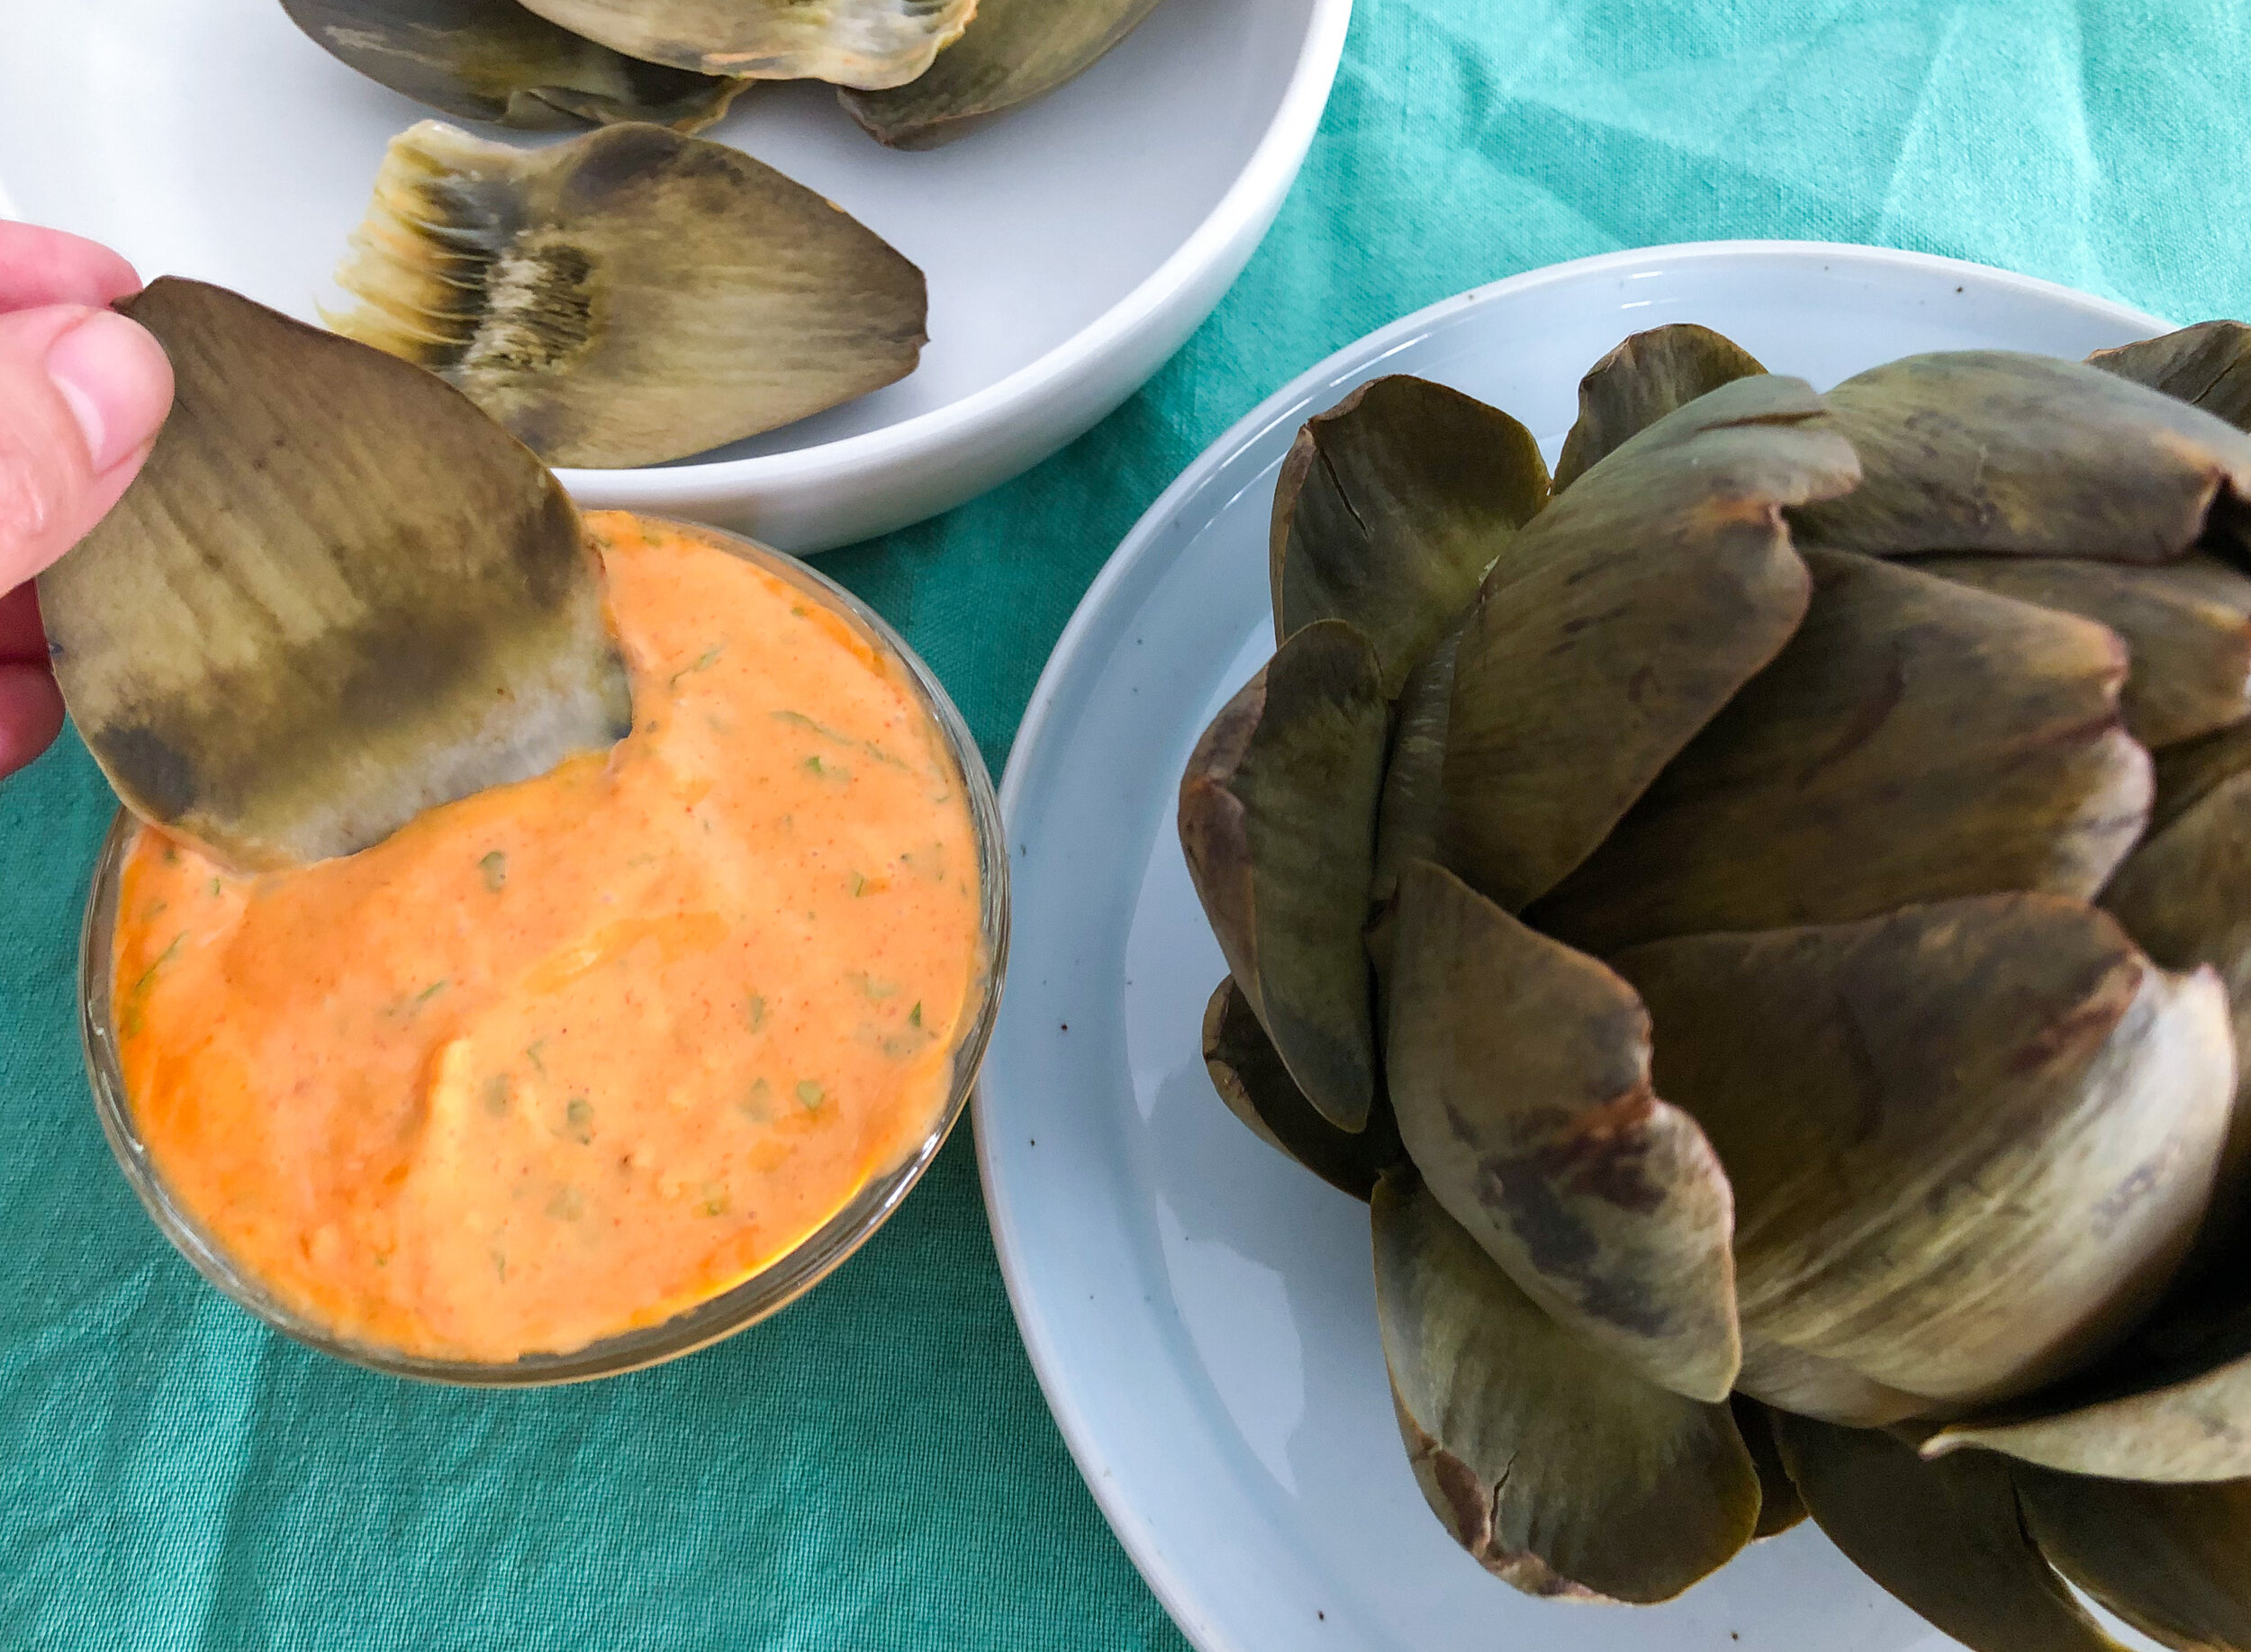
Putting out a whole artichoke as a nibble for an apéro or happy hour is delicious and serves all of the drama, dahling. However, contrary to what she's serving, this recipe is deceptively simple. To have an enjoyable whole artichoke experience, I think it's essential to pair this prickly queen with a creamy dipping sauce—for opulence. Use the leftover gochujang sauce during the week and drizzle it on roasted veggies, spread it on sandwiches, or however else you please. 

IMG_5401.JPG


Recipe Type: snack or appetizer

Time: 1-1.5 hours

Servings: 2-4

Ingredients

1 large artichoke 

½ cup of mayonnaise (preferably homemade)

1 tablespoon gochujang

1 teaspoon soy sauce

1 teaspoon sesame oil

One lime

One lemon

2 tablespoons finely chopped cilantro (including stems)

2 tablespoons finely chopped scallions

Sesame seeds

Salt and Pepper to taste

Equipment

Pot to cook the artichoke

Mixing bowl

Knife

Cutting board

Microplane

Instructions

  • Bring a pot of water, large enough to submerge the artichoke, to boil. Cut a lemon in half and squeeze both halves' juice into the pot and add the two lemon halves. When the water is boiling, add a generous amount of salt (like salting pasta water).

  • Wash the artichoke, then remove the stem by placing the artichoke on the counter, holding it to the counter with one hand, and using your other hand to press down forcefully on the stem to snap off the base. The stem should snap off along with some of its fibrous veins in the stalk, leaving the bottom of the heart exposed. Immediately add the artichoke to the pot of water.

  • Lower the heat so the water is at a simmer, and cook the artichoke until the bottom of the heart (the opening where the stem once was) becomes tender, and you can easily pierce it with a paring knife or cake tester. This will take anywhere from 45 minutes to an hour and a half depending on the artichoke size.

  • While the artichoke is cooking, prepare the dressing. I strongly recommend using homemade mayonnaise (the recipe and instruction videos are here).

  • In a small mixing bowl, add ½ cup of mayonnaise, one tablespoon of gochujang, one teaspoon soy sauce, sesame oil, one teaspoon of lime zest, the juice of ½ the zested lime, and two tablespoons of chopped cilantro and sliced scallions.

  • Mix, add salt, pepper to taste. If needed, add more lime juice to balance the acidity in the sauce. Place the sauce in a serving dish and garnish with toasted sesame seeds.

  • When the artichoke has cooked, pull the artichoke out of the boiling water with tongs letting the excess water drip back into the pot. Plate and serve with gochujang cilantro sauce.

How to Serve

  • Serve the hot cooked artichoke with the dipping sauce. Serve with a bowl to discard artichoke leaves.

  • Eat by removing a leaf from the artichoke and dipping the base (not the pointy side) into the sauce. Scrape the bottom flesh off with your teeth.

  • Enjoy all the leaves until you get to the heart/choke. You'll notice the leaves get thinner until you reach the choke with long inedible fibers. Scrape off the inedible choke with a spoon, discard the choke, and then cut the heart of the artichoke into little pieces, dip into the sauce, and enjoy!

IMG_6410.jpg
IMG_6411.jpg

Ma’s Home Fries

My Ma, Judy Colemanone of my fabulous mother-in-laws, makes the BEST home fries, and has graciously taught me how to make them. This no-recipe recipe can be made with a few ingredients that I usually have on hand and half an hour. Frying and steaming the potatoes and onions simultaneously yields beautifully browned, crisp, and tender morsels with pops of sweetness and umami from the caramelized onions.

IMG_9433.JPG

Recipe Type: No Recipe Recipe 

Time: 30 min 

Servings: Customizable (The following guidance makes enough for 2. Scale up as needed.)

From: French Omelette & Ma’s Home Fries

Ingredients

3 small/medium potatoes per person - peeled and diced into 1 inch cubes 

½ onion

Cooking Oil 

Pantry spices (I used onion powder/garlic powder/and Slap Yo Mamma Cajun spice mix)

Salt and Pepper to Taste

Chopped fresh herbs you have on hand (optional for garnish)

Sour cream or crème fraîche (optional)

Equipment

Nonstick frying pan, 8” or bigger

Lid for pan (or baking sheet to cover)

Wooden Spoon

Instructions

  1. Wash and peel potatoes (if you have a thin skinned potato, you can leave skin on) and cut into 1 inch pieces. Cut half an onion into ½ inch slices. 

  2. Heat nonstick frying pan over medium high heat and add 2-3 teaspoons of some cooking oil (olive, grape seed, sunflower, etc.).

  3. Once the oil is hot, add potatoes and onions to the pan. Sprinkle with your preferred spices and add 2-3 teaspoons of water on top of the potatoes. Cover the pan and cook. You’ll hear the potatoes/onions sizzle while cook. This is great! Leave them alone to do their thing for 2-3 minutes. 

  4. After 2-3 minutes, lift the lid and give the potatoes/onions a stir and cover again. Lower the heat to medium and continue stirring every 2-4 minutes. The lid and water will steam the potatoes until they become fall-apart tender while the heat from the bottom of the pan/stove will brown the potatoes and caramelize the onions. If you notice the potatoes starting to burn, then lower the heat and/or add more cooking oil. 

  5. Continue cooking and stirring the potatoes and onions until they are browned and there are lots of crusty bits (around 15-30 minutes). You’ll want to stir the potatoes more frequently toward the end of cooking. 

  6. Serve immediately. If you have any fresh herbs or sour cream/crème fraîche on hands go ahead and top the potatoes with them. 

24 Hour Cold Brew Coffee

I live for cold brewed coffee. I drink her all four seasons. You will find me in the dead of winter in a furry hat and parka clutching a cold brew with my mittens. Sometimes I take her with a splash of whole milk. Sometimes, I want her crispy, cold, and black. My new schedule requires that I wake up at 6 am on certain mornings and on those days, cold brew coffee is my one true light and joy. The thing is, cold brew is REALLY EASY to make and hell of a lot cheaper than buying it out. Also, it’s super eco-friendly to byo coffee rather than contributing to all the single-use plastic/paper waste.

Final Cold Brew.JPG

Recipe Type: Quick and Easy

Time: 24 hours and 15 minutes to filter 

Servings: 6

From Le Hangover Party

Ingredients

  • 64 grams coarsely ground coffee

  • 800 ml of water

Equipment

  • 4 cup French Press

  • Stainless steel pour over coffee filter or a paper coffee filter over a mesh strainer (optional)

  • A vessel to strain your coffee into the first time (optional)

  • A vessel to store your liquid gold

Instructions

First round of filtering

First round of filtering

  1. If you have a coffee grinder, grind the beans on the coarsest setting right before brewing. If you don’t (which we don’t in Paris) ask the place where you bought your beans to grind the bag for you. I learned that for cold brew, if the beans are ground too fine, then the bitter flavors will be more prominent in your final cold brew. The ratio for cold brew is 80 grams of coffee per liter of water. Since I have a 4 cup French Press (and a liter is around 4.23 cups), I adjusted my measurements to 64 grams of coffee and 800 ml of water (80% of the original).

  2. Place coffee grinds into the French Press and fill with water. Mix the coffee with a spoon and set the lid on the french press and press slightly. Do not fully press down on the plunger. Set aside at room temperature and let the coffee brew for 24 hours. 

  3. After 24 hours, plunge the french press. You can serve as is, or if you want a smooth ass brew, pour through the stainless steel pour over filter (or paper filter) into the first vessel. This first filter takes a longer time. You may need to rinse out the filter in the middle of the batch. 

  4. After the first round of filtering, rinse out the filter and place over the final storage vessel. Filter the cold brew a second time. This time should be much quicker.

How to Serve

Final filtration

Final filtration

Store cold brew in the fridge and serve over ice.

Breakfast Nachos

Nachos are DELICIOUS, easy to make, and such a crowd pleaser. As a Texas raised queen, I grew up with access to beautiful Mexican and Tex-Mex cuisine. My interpretation of nachos is based on the flavors of my home state and is kind of a template that is customizable to your preferences. Bake these beauties on a half-size baking sheet covered with parchment paper for a low mess meal. You can prepare the ingredients the night before and assemble the nachos right before (or as) your guests arrive. Set the whole tray in the center of the table and let everyone dig in. Easy, chic, delicious!

Breakfast Nachos.JPG

Breakfast Nachos

Recipe Type: Quick and Easy, Brunch

Time: 30 minutes

Servings:

From Le Hangover Party menu

Ingredients

Nacho foundation

  • One bag of tortilla chips

  • Two 8 oz bars of melty cheese. I use a combo of Monterrey Jack and Cheddar you don’t need to buy super fancy cheese for these nachos (you can also buy grated cheese, but usually these cheeses are covered in starch so that it doesn’t stick together in the bag. I don’t much care for that)

  • 1 15 oz. can of re-fried beans

Toppings (this is what I used for this round of nachos, but you can use whatever you want)

  • 2 Sliced fresh or pickled chilis - I used fresh serrano chilis in this batch

  • ½ cup of sliced radishes

  • ¼ cup cilantro (wash/dry and pick leaves off or roughly chop - cilantro stems are tender and you can eat them)

  • 4-5 bacon slices

  • 1 avocado sliced

  • 1 lime cut into wedges

  • 2-3 green onions sliced

  • White vinegar (optional - a couple tablespoons or so)

  • 4 eggs

Equipment

  • Cheese Grater

  • Half-size baking sheet

  • Parchment paper 

  • Mandoline (optional for slicing vegetables)

  • Fish spatula 

  • Small saucepan to heat refried beans

  • Skillet to cook bacon

Instructions

  1. Wash and dry produce in a bowl filled with water and an optional splash of white vinegar (to clean produce).

  2. If using bacon, cook the bacon in a skillet. Once cooked, remove from pan onto a paper towel lined plate.

  3. Heat canned refried beans in a saucepan with a lid (optional thin out the beans with a little water). Once the beans are bubbling, take them off heat and set aside.

  4. Chop/slice/prep all the toppings for your nachos, grate cheese, and set ingredients aside. If you’re planning to make the nachos the next day cover and store in fridge.

  5. 15 minutes before you’re ready to heat your nachos, preheat oven to 350 ℉.

  6. Place parchment paper on a baking sheet and spread chips evenly over the sheet. Distribute re-fried beans over the chips. Then, top with as much cheese as you want. The key to a great bite is to make sure that you cover as many chips with some cheese/beans. Be equitable and intentional in how you distribute ingredients. 

  7. Pop the nachos into the oven until the cheese melts. This takes around 10 minutes give or take a few depending on your oven. Keep your eye on the oven. The nachos are ready when the cheese is melted and oozy.

  8. When the cheese on the nachos are nearly melted to perfection, begin to fry the eggs. I believe a fish spatula is the best spatula for fried eggs. Set aside on a plate when fried. 

  9. Pull the hot nachos out of the oven and scatter all of the toppings all over the nachos and top with the fried eggs.

Breakfast Nachos Hand.JPG

How to Serve

Serve immediately family style with lacto-fermented hot sauce. I simply put the whole baking sheet in the middle of my table (on top of a trivet or towel of course). Enjoy!

Shaved Summer Zucchini Salad

Remember when zoodles were THE thing? TBH, I didn’t much care for the water-logged non-carb moments. I prefer my zucchini young, fresh, and yellow. I look for the teeny baby yellow ones and throw in a couple little green guys into the mix for color. The younger zucchini tend to have fewer seeds and less moisture. The ribbons are elegant and delightfully crunchy. Grab the baby zucchini from the farmer’s market before the summer is over!

Read More

Ssam Jang and Lettuce Wraps

Ssam Jang is a Korean soybean based sauce that is incredibly complex in flavor and a crowd pleaser. It is an umami bomb that is savory, salty, and deeply satisfying to eat. Make a batch, and serve with rice, Korean BBQ, lettuce wraps, or even mix some with mayo and put on top of a hot dog. Trust and believe you will want to keep this sauce in your fridge.

Read More