Celery Salad

I love having celery in my fridge to make stock or as a base for a sofrito or something, but I find that I never need a whole head of celery, just a few stalks. I always get sad when celery goes to waste, so I chop up whatever I have left in my fridge to make cute, crunchy salads. I like the brightness of the tart cherries and mustardy vinaigrette. It works perfectly as a starter for fondue or a quick lunch with some chicken. You can quickly adapt this recipe by throwing in what you think will go well from your fridge, a little cheese if you’d like, some apples, or whatever you want. 

Ingredients

Salad

1 head of celery (or whatever you have after you've cooked with celery)

¼ cup of dried unsweetened cherries

½ cup pecan halves raw

1 scallion 

Vinaigrette

Juice of one lemon

1 teaspoon of Dijon mustard

1 teaspoon honey (maple syrup or sugar are great substitutes)

¼ olive oil

1 clove of minced garlic

Salt and pepper to taste

Flakey salt to finish

Instructions

Toast the pecans in the oven at 375℉ or 190℃ for 5-6 minutes or until just toasted. Remove them from the oven, cool them, and set them aside.

To assemble the dressing, whisk together the Dijon mustard, lemon juice, and honey in a small bowl. Slowly drizzle in about a fourth cup of olive oil while whisking to create a smooth, emulsified dressing—season with salt and pepper to taste.  

Wash and cut celery into thin slices on the diagonal (⅛ inch or ⅓ cm-ish). I love the drama of a thin and severe diagonal slice. Place sliced celery in a large mixing bowl. Chop the cherries and pecan, mince the herbs, and add them to the bowl of celery. 

Fifteen minutes before serving the salad, toss the ingredients with the vinaigrette. I like to let the salad sit a little to soak up the dressing. If you let the salad sit too long, it’ll release a lot of water, and the celery will get soggy. Taste and top with some flakey salt right before serving. If I’m feeling jazzy, I’ll drizzle a little extra honey on the top when I add flakey salt. 

Fondue Neuchâtel

At some point in early winter, I decided it was time to demystify fondue for myself and figure out how to execute this type of dining. Why shouldn’t I? I adore the seventies, love table-top cookery, and a little quest. I began where I often do: with questions to ask and research to seek answers. I went online and found I didn’t care for the guidance, lack of context, or basic copy-paste recipes and posts. So I ordered Fondue Cookery (1970) by Alison Burt. I must share that I picked this book purely based on vibes, as the reviews I found online were sparse and unhelpful. The moody cows on the side of the ceramic crock, the hunk of cheese with a teeny Swiss flag perched on top, and the sizable Sans-serif typeface on the upper right-hand corner of the background screamed seventies. When the book arrived and I saw a picture of her clad in a two-toned orange latex apron, setting her dimly lit kitchen for breakfast, I knew Alison was the one who could and should guide me through my fondue journey. I read through the book quickly; the recipes were variations on a theme, and I found her introduction chapters most helpful. I learned fondue originates from Switzerland due to geography and climate and because of eating foods preserved for the long winters. As the winter snows cut off the access from the smaller villages to the main towns, the villagers would rely on locally made cheese. As the cheese aged, it would dry and harden, and melting this hard cheese with wine was a way to make the cheese more palatable. Fondue originates from the French word fondre, which means to melt. 

Whilst I waited for my book to arrive, I began my quest to procure a fondue set. I knew what I did not want: electric pots (cords are cumbersome), tea candle fondue pots (Absolutely not. What is a tea candle going to cook?), or any type of fuel that I could not find at my local hardware store. I knew I could find Sterno easily, so I decided to find a pot and stand that would be compatible with that. I also love a good eBay hunt and searched for a vintage fondue set. I found one from the 70s in a vibrant shade of orange to match Alison’s apron, of course, and when she arrived, I was delighted by how vibrant the shade of orange was. But I was also disappointed because she was missing her lid, and the aluminum felt flimsy. Alison wrote the best pots are earthenware caquelons. Caquelon is the name of the fondue pot. This information I read after I ordered my pot. I’ve since learned that enameled cast iron pots are also a good choice, and aluminum pots are horrible to clean. 

Romaine and I decided to make fondue on a cold, snowy December evening when our friend Joe would arrive from NYC. The day of, Romaine grabbed some oysters, last-minute groceries, and a crispy white wine before picking up Joe from the train station, and I began my mise en place, washing and chopping the vegetables for the meal. I popped the mushrooms, potatoes, and sausage in the oven. Then, I made a bright, zippy salad with celery I wanted to use up from the fridge and tossed the celery with chopped dried tart cherries, freshly toasted pecans, herbs, and a bright vinaigrette. I grated Emmental and Gruyere cheese in the food processor and cleaned up. Romaine pulled out the ice cream maker to make apple sorbet with local Vermont apples. We’d later top the sorbet with a splash of Calvados to make a Trou Normande for dessert, though usually, it’s a palate cleanser served between courses thought to aid digestion during lengthy feasts of hearty Northern French foods. 

Joe set the table, and Gaston pattered around, sniffing excitedly. I melted the cheese gradually on my stove in my bright orange aluminum pot and brought the melted cheese to the table. I lit the Sterno, and the blue flame gently appeared, contrasting beautifully with the orange pot. I speared a piece of potato and dropped it into the pot, swirling it around to mix the cheese. I lifted my fondue fork, twirled the cheese around the potato to avoid drippage, and lifted the exquisite bite to my lips. I sat silent momentarily, appreciating and reveling in the cheese and wine. I eventually returned to the table and joined the conversation again, the three of us joyfully dipping into the communal pot while the fire in our wood stove crackled merrily.

Fondue Neuchâtel

Adapted from Fondue Cookery by Alison Burt

Recipe type: Interactive Cooking

Time: 30 minutes of preparation

Serves 4

Ingredients

1 clove of finely minced garlic

1 ½ cup of dry white wine

1 tablespoon of cornstarch

1 lemon

3 tablespoons of kirsch (optional)

2 cups of grated Emmental cheese

2 cups of grated Gruyère cheese

Salt and pepper to taste

A touch of freshly grated nutmeg

Equipment

Fondue pot (ceramic or enameled cast iron)

Heating element for fondue and stand (I use Sterno)

Fondue forks

Instructions

In a quart-sized pot, or you can do this directly in your fondue pot if it is stovetop safe, add one cup of white wine (reserve the other half cup), finely minced garlic, and the juice of half a lemon (about 1.5 tablespoons). Bring to a simmer. The acid from the lemon juice will help the cheese emulsify with the wine and become a silky smooth mixture. 

Prepare the cornstarch slurry while the wine is coming up to a simmer. Add one tablespoon of cornstarch and the remaining ½ cup of wine, and whisk together. Whisk the mixture to incorporate the cornstarch and wine when the wine comes to a simmer. Then, mix the slurry to combine the starch and add it to the simmering pot of wine. 

Once the wine mixture is simmering, gradually add the grated cheese, stirring continuously. Monitor the heat; you want your heat to be medium-low so the cheese melts slowly and doesn’t scorch. Visually, you’re looking for the cheese to melt with an occasional bubble burbling up. You don’t want to see a rolling boil on your cheese or hear sizzling from the bottom of your pot; that means your heat is too high. Continue gradually adding the cheese until all of the cheese has melted.

The next step is optional: add the three tablespoons of kirsch to the pot and stir as you incorporate it into the cheese mixture. 

When the cheese has melted, it should be smooth. If the cheese liquid is too loose or watery, that’s fine. As the fondue continues cooking tableside, it will become thicker as the moisture evaporates. If the cheese is stringy or clumpy, add more lemon juice to make it silkier. 

Season to taste with salt and pepper. The cheese mixture will continue to reduce and concentrate in flavor as the liquid evaporates, so avoid oversalting. Add a few grates of fresh nutmeg. 

Transfer the melted cheese mixture to your fondue pot and bring to the table to enjoy. 

I like to serve fondue with torn-up bread, charcuterie for meat eaters, roasted mushrooms for vegetarians, and roasted potatoes. To offset the richness of the cheese, I like to serve a bright, acidic salad. I usually serve a simple green salad or a crunchy, bright celery salad (recipe here). 

Fondue Tips

Monitor the heat. If the cheese is bubbling too aggressively, I turn off the heat and then turn it back on (since I use Sterno gel and a flame for my fondue set-up). If you’re using an electric fondue cooker, keep the heat low if the cheese gets too hot. 

Stir when dipping - stir the cheese when dipping to keep the cheese mixed and the consistency nice. 

If the cheese gets too thick, add a little splash of white wine to loosen the mixture. 

Iced Matcha Cortado

I love coffee in the morning and matcha in the afternoon. Mostly, I love the ritual of preparing matcha—blooming the chasen (bamboo whisk), using ceramic bowls I’ve made, and taking a few minutes to pause in my day.

I normally drink matcha without milk, but sometimes I want a matcha cortado. A cortado in the coffee world is equal parts steamed milk and espresso (2 oz.) and differs from a latte which contains too much milk for my preference. 

With matcha, it’s easy to get lost in all the different varieties. I’m certainly no expert in the field of matcha, but I like to buy small quantities of a nice ceremony grade matcha, and use before its “best-by” date. As with any recipe, this is a suggestion and a baseline to tweak to your taste (perhaps it’s a technique?). I prefer my matcha cortado with less milk and a little more water. Make it how you want.

Here’s a gentle video of me making a matcha cortado.

Recipe Type: easy

Time: 5 minutes

Servings: 1

Ingredients

2 cups of boiling water cooled to 176 °F

¼ cup of milk

¼ cup of water

1 teaspoon of matcha sifted

Ice

Maple syrup or simple syrup to sweeten (optional)

Equipment

Small metal whisk or bamboo chasen

Bowl to whisk matcha

Bowl to bloom chasen if using

Small glass filled with ice (I’m using a 12 oz glass or 1.5 cups)


Instructions

If you have a hot water boiler with temperature control, set it to 179°F. If you only have a hot water boiler, cool the water by pouring it into a ceramic or glass bowl. 

If using a chasen, bloom it in a bowl of hot water for a few minutes while you sift the matcha into the bowl.

Sift 1 teaspoon of matcha into a bowl. 

Pour ¼ cup of hot water into the bowl with the matcha bowl. I like to pour the water slowly down the side of the bowl so it doesn’t create a little matcha cloud. 

Whisk using a w shaped motion to quickly incorporate the matcha. 

If using a sweetener add it, and whisk to combine 

If using a chasen, clean by whisking it in the bowl of hot water you bloomed it in. Let air dry. 

Assemble the cortado by pouring ¼ cup of milk into your serving glass that’s filled with ice. Top with matcha. Give your drink a stir and enjoy immediately!


Cheesy Scallion-y Party Biscuits

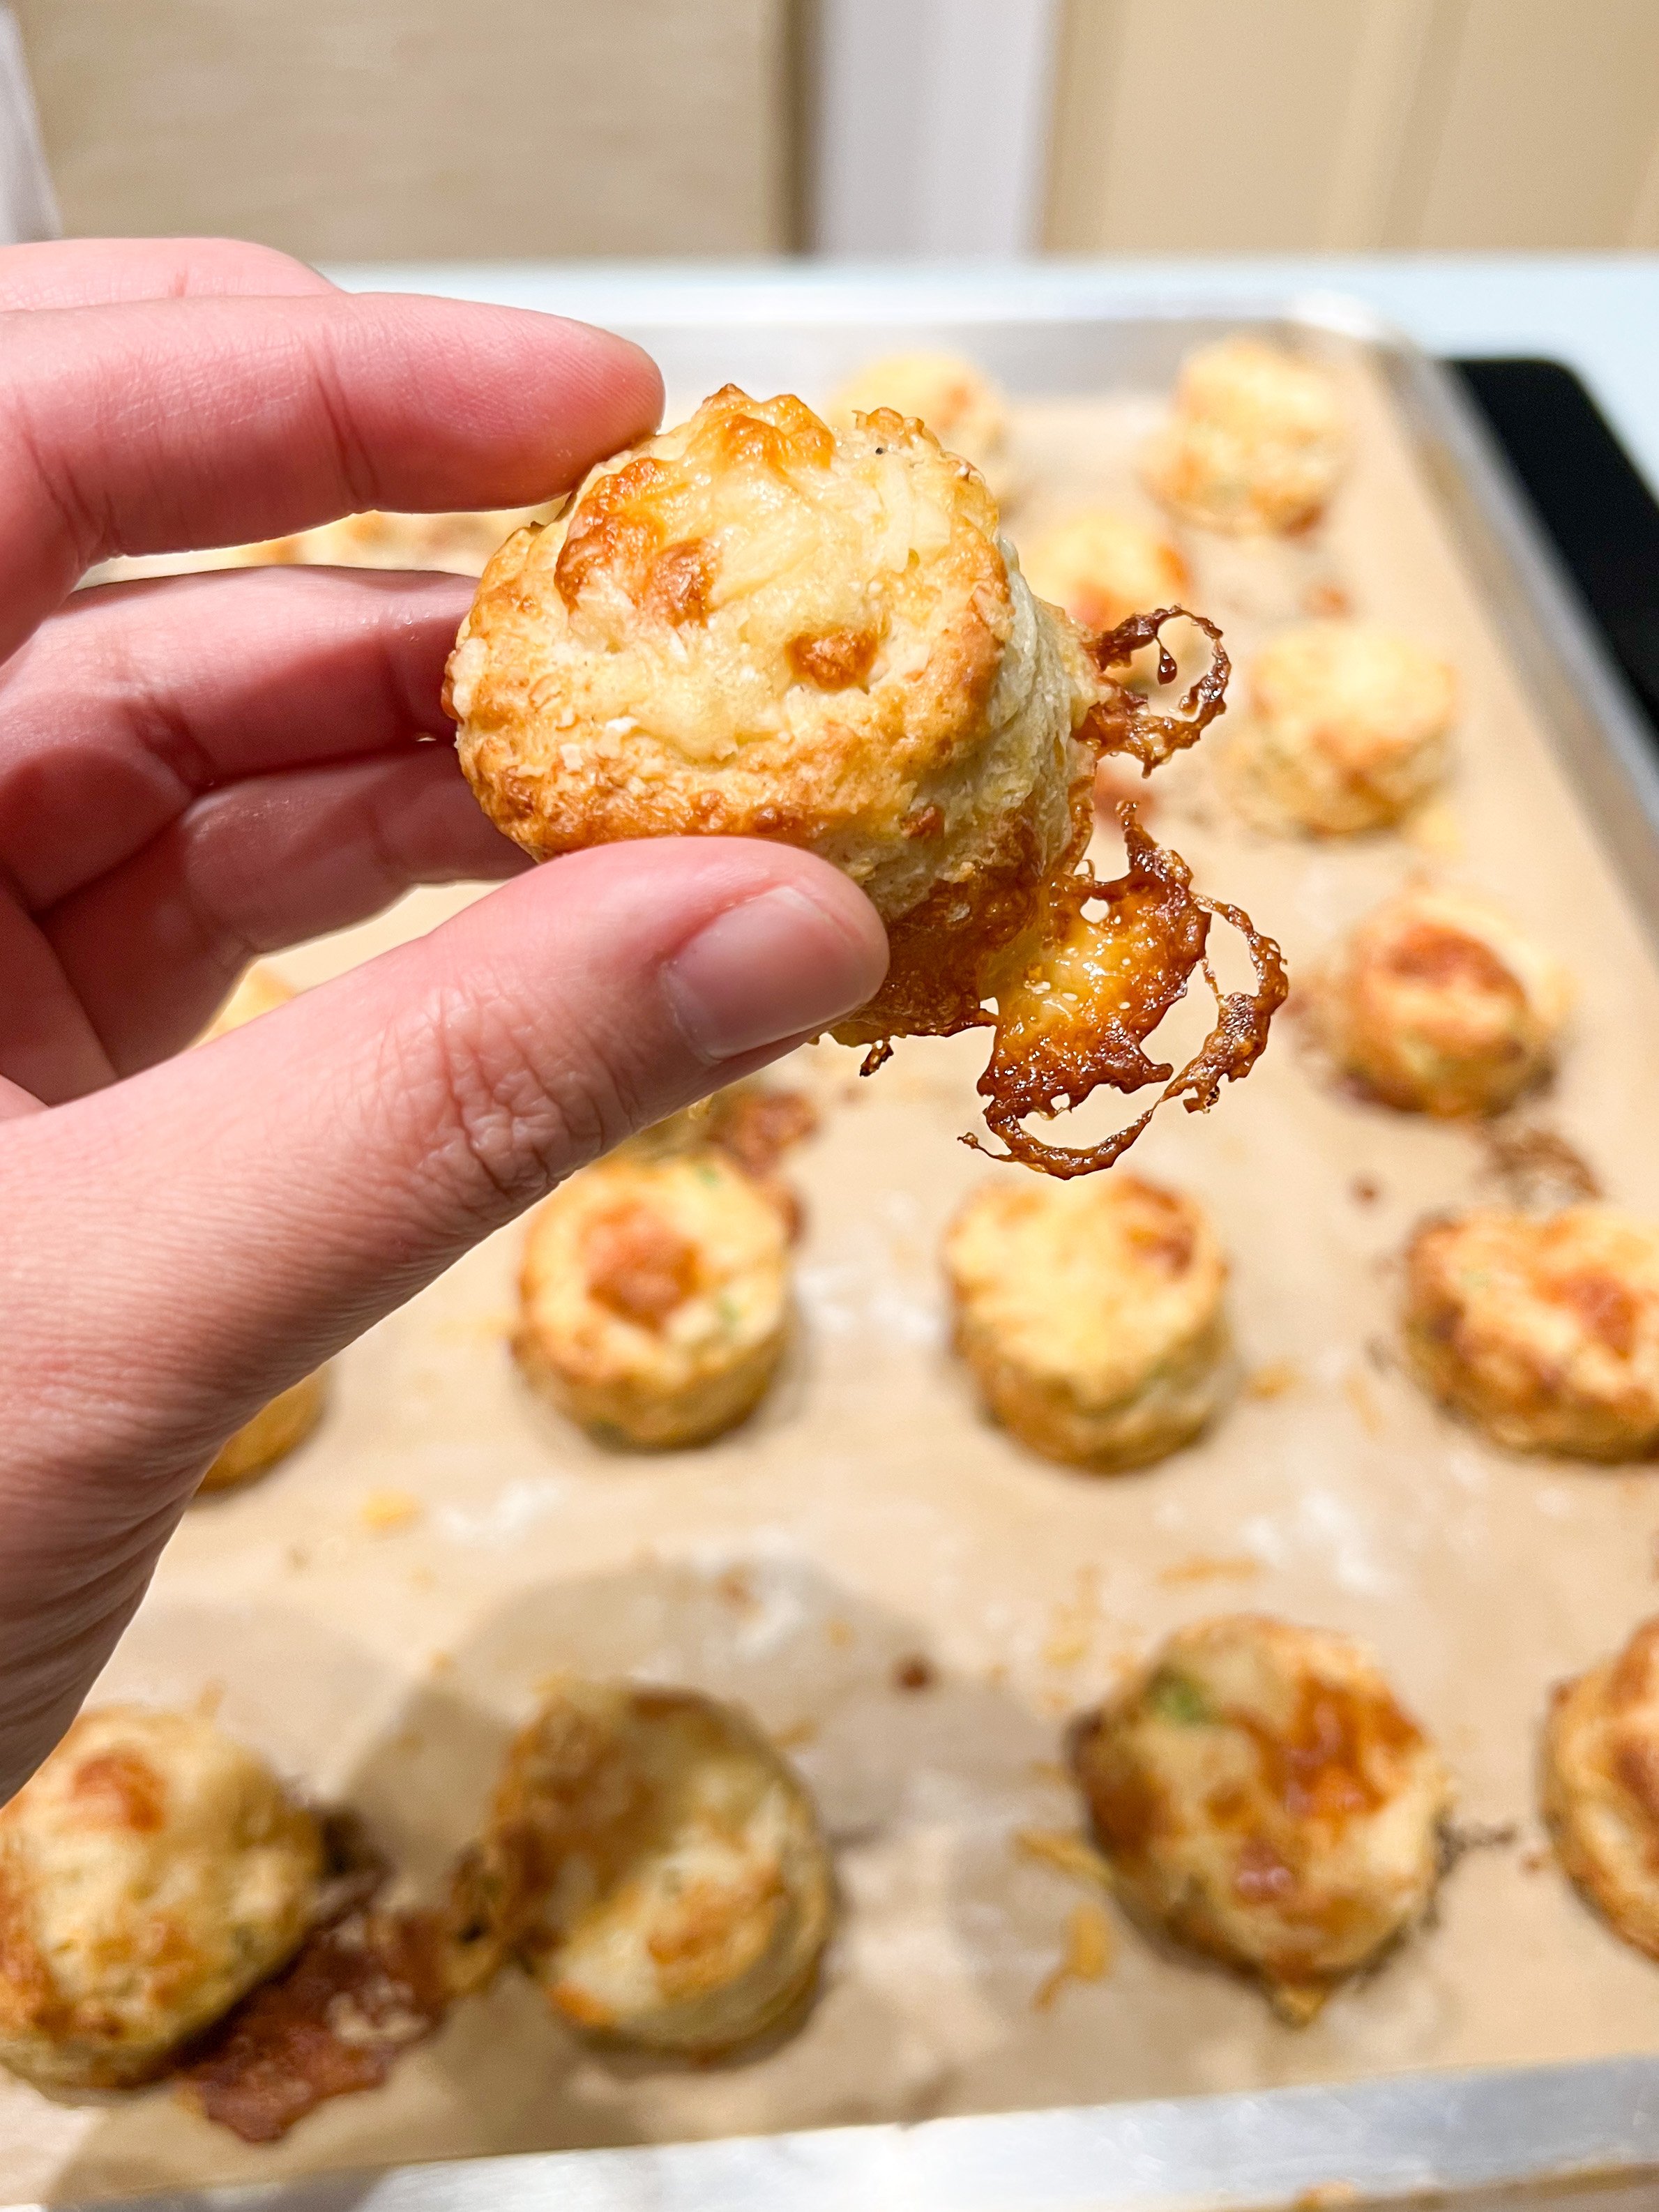
My ideal party food (at a cocktail party) is one I can eat in a bite or two whilst holding my drink. This snack would be considerate of my constant battles with gravity and wouldn’t drip onto my fit or the floor, and wouldn’t require silverware or a seat to eat. This recipe is just that, a biscuit dressed for a party. She’s jazzed up with scallions, grated cheese, and hot Cajun seasoning. I use a 1.5-inch biscuit cutter to make this a two-bite (or, for the ambitious, one-bite) moment so you and your guests can nibble away. Or, if you’re wanting a bigger biscuit, you do you. It’s your world, babe. 

Recipe Type: appetizer

Time: 1.5 -2 hours

Servings: 25-30 small biscuits

Ingredients

1 ¾ cups all-purpose flour plus extra for rolling out dough

¼ cup of whole wheat flour

2 tablespoons of baking powder

2 teaspoons sugar

1 teaspoon kosher salt or ½ teaspoon fine salt

5 tablespoons of cold, unsalted butter

1 cup of whole milk

¼ of sliced scallions (4-5 scallions depending on the size)

1¼ cup of grated melty cheese such as cheddar, gruyere, or whatever you have on hand. 

½-1 teaspoon of cajun seasoning (I love Slap Ya Mamma hot) or whatever herbs/spices you want

1 egg

Equipment

Mixing bowl

Measuring spoons/cups

Rolling pin

Plastic wrap

1.5-inch round biscuit cutter 

2 sheets of Parchment paper

Baking sheet 2

Pastry brush 

Pastry Cutter (optional)

Instructions

Gather your ingredients and tools. Preheat the oven to 425℉/220℃ and place one rack in the bottom third of your oven and one in the top third. 

Grate your cheese. I used a blend of cheddar, Gruyere, and Parmesan most recently because I wanted to use up what was in my fridge. 

Add AP flour, whole wheat flour, salt, baking powder, and sugar in a large bowl. Give the dry ingredients a stir with a spoon. 

Add the cubed butter with your pastry cutter, or fingers cut/pinch the butter until they become small irregular chunks of various sizes ranging from pea to lima bean. 

Add 3/4 cup of the grated cheese into the mixing bowl. Reserve the remaining ½ cup for the topping. Add the scallions, seasoning powder, and all of the scallions, and the seasoning powder. Give the ingredients a quick toss with your hands or stir with a spoon. 

Add 75% of the milk and mix with a spoon. The dough will start together and become shaggy. Try to mix in the liquid quickly without over mixing (to avoid gluten development.

With one clean hand on the bowl and one hand in the dough, begin to feel the dough as you add the remaining milk slowly. Incorporate the liquid into the dough as you gently turn the dough and try to soak up the dry flour, butter, and milk. You don’t want to overwork the dough or over-hydrate the biscuit. Add more milk, if necessary, a tablespoon at a time (whole wheat flour tends to drink up more liquid because it contains more bran). The dough is ready when it just comes together like pie dough. You don’t want it to be too wet or sticky. The flour will continue to hydrate in the fridge. 

Flatten the dough into a disk around 3-4 inches thick and wrap it in plastic wrap. Pop in the fridge for 20-30 minutes so the dough can hydrate, and the butter can chill. 

Remove the dough from the fridge and sprinkle a clean workspace with flour. With your rolling pin, roll the dough evenly until it’s around two inches thick. Next, cut the biscuit with the cutter and place it on a parchment paper-lined baking sheet, spacing them a couple of inches apart. 

Smoosh the remaining dough together by gathering it from the sides, pushing it into the center, and patting it into a disc. Rest for 15 minutes in the fridge, wrapped in plastic, before rolling out.

While the remaining dough is resting, crack one egg into a small bowl and add two tablespoons of water to the bowl. Beat the egg until it becomes a loose homogeneous liquid. In the meantime, brush all of the biscuits with the egg wash. Then top with cheese. Place this tray into the fridge as you roll and cut out the remaining biscuits. Place the 2nd round of biscuits onto the second baking sheet and repeat the egg wash and cheese topping process. 

When both trays of biscuits are ready, place them into the oven on the top and bottom racks, and set a timer for 10 minutes. After 10 minutes, rotate the trays so they spend time in the bottom and top racks. Add more time to your timer in 2-minute increments until the biscuits are golden and the cheese has begun to brown in spots around the biscuit. 

How to Serve

Serve immediately, or cool and take to a party in an oven-safe baking dish. You can have the host pop these into a 375℉/190℃ for five-ten minutes to refresh. They’re best when warm. 

Mac & Cheese

By: Romaine C. Martin III

I consider Mac & Cheese one of the many great gifts from Black folk to America. It was introduced to the USA by James Hemings – an enslaved man “owned” by Thomas Jefferson and founding father of American cuisine – after he returned from culinary training in France at Jefferson’s direction. Today, there is an unfortunate ambiguity between Mac & Cheese as Hemings made it and its more humble and expeditious cousin, stovetop mac. While the stovetop style has its place, that place is decidedly not at the table of a Black function. This recipe is a variation of my aunt’s and has filled my plate at many a holiday gathering.


Time: 30 minutes prep time, 40 minutes cook time

Serves: 8 

Ingredients

  • 2 lbs cheese, grated, plus more to taste – I like a mix of sharp cheddar (for in the cream sauce) & Colby jack (for topping)

  • 2 egg yolks OR ~4 oz Philadelphia cream cheese

  • 2 tbsp flour

  • 4 cups milk

  • ½ stick butter

  • Spices for flavoring – can be sazon, “better than bouillon,” cajun seasoning, etc.

  • One box of elbow macaroni (16 oz. or 454 g)

  • Bread crumbs (optional)


Instructions

Preheat oven to 350º

Prepare baking dish: rub all interior sides of a ~9x13” (or similar) baking dish thoroughly with butter, and sprinkle a handful of cheese of your choice so that it sticks to the walls/bottom.

Bring 2 cups milk plus ½ cup of water to a low simmer. Cook macaroni noodles on medium-low heat until al-dente; I like to cook a few minutes less than the suggested cooking time on the pasta box. When you’re approaching the end of cooking time, make sure to taste a few pieces that are not too soft.  

Strain the pasta into a colander or sieve on top of a heatproof bowl to save the cooking liquid! (It’s OK if the noodles absorb all the liquid!) 

Put the pot back onto the stove on medium-low heat. Melt 4 tablespoons of butter and heat until it foams. Add 2 tbsp flour and whisk until all foaming subsides and the mixture looks like smooth, wet sand. Let this cook (and stir) until it’s caramel brownish, but don’t let it burn! 

Slowly add whatever is left of the cooking liquid + the remaining milk, whisking as you add. The mixture should thicken. Turn the heat to very low.

Add Thickener

If using eggs:

  • In a medium bowl, whisk egg yolks. Slowly add ½ cup of the hot liquid from the saucepan into the medium bowl, whisking as you add (this step tempers the eggs and slowly brings them up to temperature, so they don’t turn into scrambled eggs in the hot milk). 

  • Slowly pour the egg mixture back into the saucepan with the rest of the liquid, whisking the milk as you add. 

  • Cook this mixture over low heat until it thickens enough to coat a spoon well.

If using cream cheese: 

  • Cut up the cream cheese into cubes. With the saucepan on low, whisk these cream cheese cubes in. 

  • Cook on medium-low until the mixture thickens.

Once you have a nicely thickened sauce, add about ⅓ of your shredded cheese (I like sharp cheddar) and whatever spices you have; whisk until smooth and homogenous. Taste, and add salt, pepper, more cheese, etc. (this is where all the flavor inside the Mac & Cheese comes from, don’t make the mistake of letting this be boring!)

In a large bowl, mix this sauce with your cooked noodles, then scoop this in layers into the baking dish. On top of each layer of sauced noodles, add a sprinkling of shredded cheese, using another ⅓ of the cheese.

Cover the noodles with the rest of your shredded cheese – you want a thick layer of cheese here. Feel free to add more spices to the top.

Cover with foil and bake for about 25 minutes or until the cheese on top is bubbling.

Remove the foil. If using bread crumbs, sprinkle them on top now. Bake, uncovered, for another 10-15 minutes, until you have a nice golden crust and browned edges.

Strawberry Rhubarb Upside Down Cake

Recipe from Dorie Greenspan 

Adapted by Jen Kim

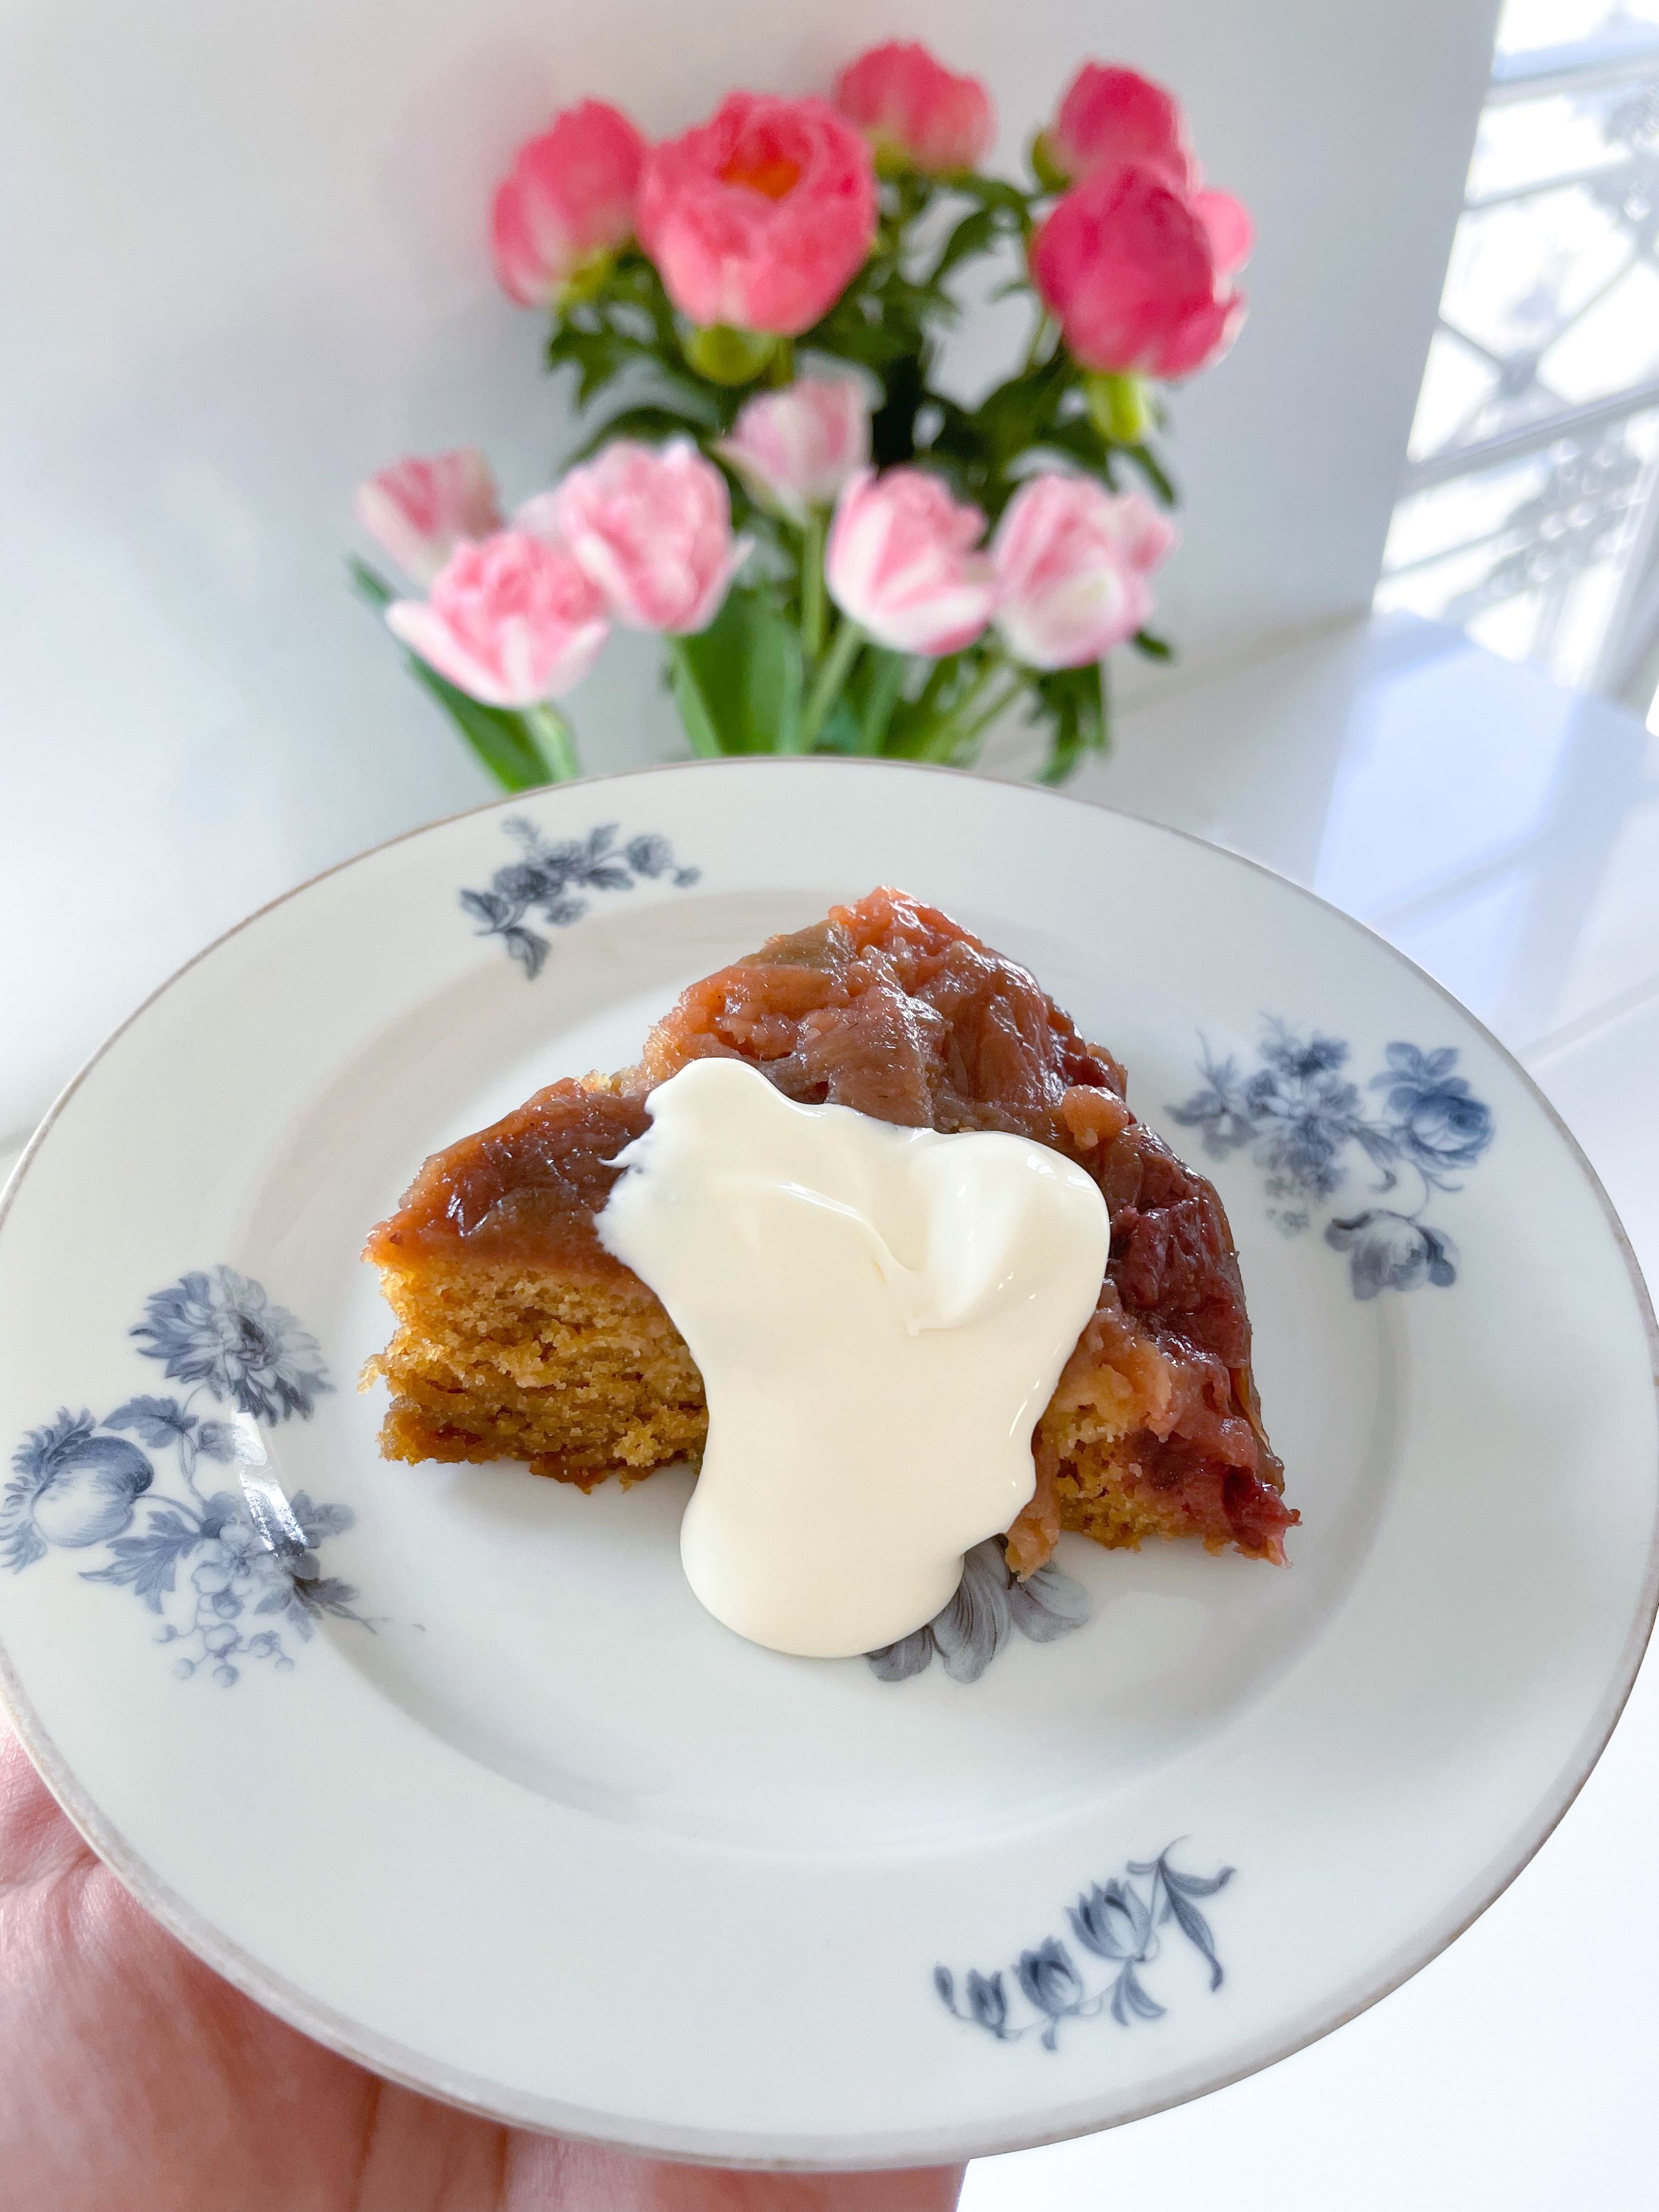
The first peonies of the season (the coral ones, according to the flower vendor), asparagus, rhubarb, and strawberries have emerged in the marché. It’s spring in Paris. While I’ve been busy packing for another international move back to the States this time, I’ve been making time to bake and cook my favorite spring produce to catch the fleeting beauty of this season. Since Romaine and I have given away, sold, or shipped most of our things, our cooking and baking projects have to be simple. 

This recipe is an adaptation of Dorie Greenspan's Rhubarb cake in Baking Chez Moi, one of my favorite cookbook authors. I’ve baked this cake several times with her recipe, and over the years, I’ve modified it to work for me. I’ve changed the rhubarb topping, skipping the maceration phase and adding strawberries to the rhubarb. I’ve swapped out most of the melted butter in the cake batter for oil because I love the moist crumb and oil cake produces, and I pop the batter directly into the skillet because I don’t have a cake pan. The resulting cake is fabulously delicious and is best served with a dollop of crème fraîche after a chic spring meal or as an opulent little bite with your morning coffee. 

Recipe Type: Dessert

Time: 45 minutes

Servings: 6-8

Ingredients

Rhubarb and Strawberry Top

250 grams of strawberries washed and stems removed

500 grams rhubarb washed and cut into two-inch pieces

½ cup of white granulated sugar

Two tablespoons of butter

Cake 

150 grams of all-purpose flour (1 ¼ cups)

Pinch of salt

1 teaspoon baking powder

1 pinch of salt

100 grams of light brown sugar (½ cup)

50 grams of white granulated sugar (¼ cup)

3 medium eggs (1 medium egg is around 55-65 grams)

1 ½ teaspoon vanilla

60 grams of neutral oil (sunflower, canola, grapeseed)

40 grams melted butter

Zest of half an orange or one lemon


Crème fraîche for serving

Equipment

9 inch or 24.6 cm ovenproof skillet such as a cast iron or carbon steel pan 

Mixing bowls

Large fine mesh strainer

Whisk

Scale

Measuring spoons

Knife and cutting board for fruit 

Silicone spatula

Instructions

Mise en place

Wash the fruit and cut the fruit; gather your ingredients. You can choose to pre-scale your ingredients into separate bowls, or if you’re feeling confident in weighing your ingredients scale, then you can scale them directly into the bowls (following the order of operations in this recipe of course) to save yourself from washing more dishes. 

Preheat the oven to 180℃ 350℉.


Rhubarb and Strawberry Top

Cook the rhubarb, strawberry, and sugar in the skillet over medium heat until the fruit releases around a cup of liquid and shrinks to around half its original volume. This should take anywhere from five to seven minutes. 

Take the pan off the heat and strain the fruit over a bowl to collect the syrup and return the strained fruit to the pan and place it on medium heat. Add the two tablespoons of butter and one tablespoon of the strained juice and cook until the butter is melted and the fruit has a nice glossy sauce. Take off the heat, and make sure the fruit is distributed evenly on the bottom of the pan. Set aside. 

You can use the leftover syrup to make a soda (just add sparkling water, ice, and a lemon wedge) or make a cocktail with it. 

Cake

In a medium mixing bowl, weigh the dry ingredients—flour, salt, and baking powder. Give the mixture a quick whisk and set aside. 

In a large mixing bowl weigh the brown and white sugar, add the eggs and whisk immediately to mix the two (whisk immediately because the sugar can change the chemical structure of the protein in the eggs—which means clumpy drama). Add the vanilla, oil, and melted butter. Whisk. Finally, add the orange or lemon zest and whisk again. 

Then, add half of the dry ingredients into the sugar and egg mixture and whisk gently until just combined. Then add the second half and whisk until just combined. Pour the cake batter evenly over the fruit in the skillet. Tap the pan gently on the counter to even out the batter and pop it into the oven on the middle rack. 

Bake for 25 and rotate the cake in the middle of baking. The cake will be cooked when the top has browned and a paring knife or cake tester comes out clean when you poke the middle of the cake. Let cool for five minutes then invert the skillet carefully onto a large plate. If some pieces of rhubarb are left on the skillet, place them on top of the cake. Let cool for 3 hours and then serve with a generous dollop of crème fraîche.

French Onion Soup

When I was a stagiaire at Maison, one of my daily tasks was to peel and chop approximately 50 onions to make French Onion Soup. We served the soup as an amuse-bouche topped with a bone marrow mousse in tiny searing hot v. expensive porcelain cups that were handcrafted in Japan. During service, one of my tasks was to fire the soups, pour them ripping hot into the heated cups, top them with the mousse, and walk them to the diner just as they finished their tartelettes. I'd explain the dish to them in my mauvais français, "bonsoir, c'est une soupe à l'oignon avec une mousse à l'os à moelle" while trying to maintain serene composure as the scalding porcelain melted my fingerprints. 

Each morning, I'd peel onions after I'd washed the endives and downed two coffees. While the task was overwhelming and daunting at first, I grew to enjoy the act's meditative nature and thought of it as a challenge to do this a little bit faster each day. We'd then slice and caramelize the onions in a massive skillet for a couple of hours (a couple of hours due to the large quantity) while the various stocks bubbled away on the piano or stove. I was surprised at how simple the soup was and was pleasantly surprised that we achieved such depth of flavor with chicken stock rather than beef broth. 

I never made French onion soup at home before my internship because making this soup felt like a considerable undertaking because of the beef broth. But now I make this soup all the time, and the swap of using good chicken stock makes the recipe feel very manageable to me. Because this recipe has only a few key ingredients, I urge you to use homemade chicken stock (you can use my recipe here). I make the stock in advance and pull it out of my freezer when I'm in the mood for this cozy soup. 

IMG_6971.JPG

Recipe Type: Cozy Dinner

Time: a little over an hour

Servings: 2 large servings

Ingredients

3 medium onions

1 tablespoon of butter

Neutral oil

1 liter or a quart of homemade chicken stock or beef stock

160 grams or two cups of shredded cheese such as comté, gruyère, or any melty swiss cheese

2 tablespoons Sherry or Cognac 

1 teaspoon soy sauce

½ teaspoon of chicken or beef bouillon powder

½ teaspoon of sherry or red wine vinegar

1 sprig of thyme

1 bay leaf

½ teaspoon of lemon zest 

2 slices of sourdough bread cut to fit in the top of the ramekin

Salt and pepper 

Equipment

Cutting Board

Knife

8 or 10-inch skillet

Box Grater

Pot for soup

Microplane

Two ramekins

Instructions

Caramelize the onions

  • Peel the onions, cut in half lengthwise, and slice horizontally into ⅛ inch slivers. The key to even caramelization is to have equal sizes.

  • Heat 2 tablespoons of oil in the skillet over medium-high heat, add one tablespoon of butter and let melt. When the butter melts and starts to foam and add the onions along with a generous pinch of salt. The salt will help draw out the moisture in the onions and allow them to brown more quickly. Give the onions a stir and lower the heat to medium.

  • Cook until the onions have browned entirely (around 30 minutes) and frequently stir them to ensure that the onions don't burn.

  • While the onions are cooking, grate the cheese on the large hole of a box grater and set aside. Toast the two pieces of sourdough in the toaster or in the oven at 350 until lightly toasted, heat up the homemade chicken stock (recipe here) in a covered pot over low heat with a sprig of thyme and bay leaf, and let the herbs infuse the stock.

  • When the onions have caramelized, deglaze (meaning lift the delicious brown stuff off the bottom of the pan with a liquid) the pan by adding two tablespoons of sherry or cognac. If you're cooking over a gas flame, move the pan away from the fire or turn off the gas so that the alcohol doesn't shoot up into a dramatic/dangerous flame. Let the alcohol cook off for 30 seconds to one minute, or until the alcohol smell cooks off.

  • Place the onions into the pot of stock and add ½ a teaspoon of chicken bouillon powder, one teaspoon of soy sauce, and salt and pepper to taste. Bring to a gentle simmer uncovered, and cook for 20 minutes or until the flavors have gotten cozy with one another. While the soup is simmering, preheat the broiler.

  • After the soup has simmered for 20 minutes, remove the thyme sprig and bay leaf. Taste the soup for seasoning and add more salt and pepper to your preference. Add the freshly grated lemon and a splash (¼ - ½ teaspoon) of sherry or red wine vinegar to balance the flavors.

  • Place the two ramekins on a baking sheet and ladle the soup into each ramekin. Place a piece of sourdough toast on top of the soup, and top the sourdough with the grated cheese.

  • Place the tray with the ramekins underneath the broiler. Broil until the cheese has melted, bubbles, and browns to your liking. Stay nearby and watch the soups, as this can happen very quickly depending on how hot your broiler gets.

  • Remove carefully and set on two heatproof plates. Serve immediately.

Rice Pilaf

Rice pilaf seems very 90s to me, but it’s a delicious and v. easy side to make for dinner!

IMG_7272.JPG

Recipe Type: Quick and Easy, Side Dish

Time: 30-40 minutes

Servings: 4

Ingredients

1 ½ cup of long-grained rice

½ cup diced onion (about half a medium onion)

Two minced garlic cloves

2 ½ cups of water, chicken, or vegetable stock

If using water you’ll need one teaspoon of chicken bouillon or one teaspoon of vegan dashi powder

One sprig of thyme

One bay leaf

Olive oil

Salt & Pepper

Equipment

A small heavy-bottomed pot with a lid

Knife

Cutting board

Instructions

Here’s my recipe for homemade chicken stock.

  • Peel onion and dice into ¼ inch pieces. Peel and mince two garlic cloves and set aside.

  • Heat 2-3 tablespoons of olive oil in a heavy-bottomed pan over medium-high. When the oil is hot, add the dry rice and cook, continually stirring, so it doesn’t burn. Cook the rice for a few minutes until the rice turns translucent, then slightly opaque. The rice should sound like glass beads sliding around the pot.

  • When the rice is glassy, add the onions and garlic to the pot and cook for a minute or until the onion becomes translucent.

  • Add the water or chicken/vegetable stock to the pot and lower the heat so that the rice is barely simmering. If you’re using water, add the bouillon or dashi powder to the pot and stir. Then, add the sprig of thyme, one bay leaf, and a salt to taste. Cover the pot with the lid slightly ajar and cook over low heat until the rice is cooked through and has absorbed the liquid (about 20-30 minutes).

  • When the rice is nearly finished, close the lid and let the rice steam for a five minutes or so before serving. The rice is ready when the grains of rice are fluffy and there is no liquid left in the pot. Fluff with a fork and serve!

Chicken Stock

I had a luxuriously large kitchen in Brooklyn with a full-sized fridge and freezer that I took for granted. I'd regularly make large batches of chicken stock and freeze the golden liquid in quart-sized containers to use whenever I needed, never worrying about space. Now that our Parisian freezer is disrespectfully small—the size of two and a half pizza boxes stacked on top of each other—I've had to rethink my chicken stock strategy. I no longer have space to save and freeze leftover chicken bones from roasted chickens (here’s my recipe), nor do I have room to make and freeze large quantities of stock—le sigh. 

Fortunately, I've figured out a way to keep four quarts of stock handy in my tiny freezer by applying a technique that I picked up in my French culinary school training—reduction. Reducing is quite simple; it just takes time. The technique is simply driving excess water out via boiling. By driving out the water, you concentrate the stock's flavor while drastically reducing its volume. You can also use this technique to make jus or glace/demi-glace for opulent French sauces. I concentrate my stock into a quarter of its original volume and store it in two pint-sized jars that fit neatly into the freezer. When I need her to join the party, I thaw her in the fridge overnight and reconstitute with water. 

A large batch of chicken stock made in my BK kitchen—le (wistful) sigh

Recipe Type: Easy Project

Time: 4 hours

Servings: 4 Quarts or Liters (2 pints when reduced)

Ingredients

1 medium onion 

3 cloves of garlic

1 carrot

1 stalk of celery

1 cup of chopped leek

1 handful of parsley stems

2 raw chicken carcasses 

4 raw whole chicken wings (drumstick and flap)

Leftover chicken bones from roasted chickens (optional)

1 bay leaf

A couple of sprigs of dried or fresh thyme

5 peppercorns 

1 teaspoon vinegar (apple cider or white)

Equipment

Stockpot

Various mixing bowls

Large Fine Mesh Sieve

Ladle

Skimmer (optional but highly recommended)

Four quart containers or two pint containers or four cup-sized containers or jars (if concentrating)

Instructions

  • Peel the onion and garlic. Wash the carrot, celery, leek, and parsley stems. Leave the garlic skin on and place it into the stockpot. Chop the onion, carrot, celery, leek, and parsley stems into rough one to two-inch pieces (this is a mirepoix cut). 

  • Cut up the chicken carcasses and wings into smaller 4-5 inch pieces to save space in the pot with sharp kitchen shears or cleaver, and place the chicken carcasses, wings, and various other chicken parts into the stockpot. If you have a large stockpot, you can omit this step and toss the chicken parts in whole (I do not have a large stockpot because everything in Europe is tiny).

  • Cover the pot with water, add around five quarts/liters, place on the stove, and bring to boil over high heat. 

  • Once the pot has come to a boil, reduce the heat so that the liquid simmers gently but regularly. Add the bay leaf, thyme, peppercorns, and one teaspoon of vinegar to the pot. Cook for two and a half hours, checking on the stock periodically, skimming any grey/brown gunk off of the stock while leaving the fat. Fat equals flavor.

  • When the chicken is falling apart, and you can see that the meat and bones have given all that it can flavorwise to the stock (the meat will be dry and crumbly and the bones will be soft and super fragile), strain the stock and place into quart containers. Let the stock cool uncovered on the counter for an hour. Then, cover the containers and freeze stock immediately (to avoid the spread of bacteria).

  • If you want to concentrate the stock further, wash the stockpot out, then boil the stock in the cleaned stockpot on medium-high for another hour, or until the mixture has reduced to a quarter of its original volume. Each cup of stock is equivalent to one quart/liter. You can add water to reconstitute the concentrated stock when ready to use.

  • To use the stock, thaw in the fridge overnight, or place the jar in lukewarm water for an hour or two until it comes out of the jar and reheat semi-frozen stock in a pot.

Bonus Dog Treats

IMG_6753.JPG

If you have a dog, you can make treats for your pup with the leftover chicken meat from the stock. Carefully remove the cooled chicken meat and skin from the bones and shred the meat into bite-sized pieces for your doggo. Dehydrate the chicken on a baking sheet in the oven at around 250 degrees for 45 minutes to an hour until they're completely dry. Store the treats in a jar and use them within a couple of weeks.

My poultry loving pup, Gaston, eyeing the Thanksgiving turkey.

My poultry loving pup, Gaston, eyeing the Thanksgiving turkey.

Opulent Oat Milk and Crushed Lavender Bath

It’s week three of official confinement part deux in France. I’ve found myself binge-watching shows and utterly unmotivated to cook or write. However, I have found some gratification—and opulence—in creating different ways to enjoy my bathing ritual with ingredients that are lying around my apartment.

This is a simple recipe that I created to combat the drying effect that bathing can have on my skin and requires oats, salt, and lavender. I grind the oats into a powder and mix the ground oats with sea salt and crushed lavender to make a large tea bag for my bath. The oats powder steeps into the water and turns into oat milk filled with proteins and carbohydrates that soothe, gently cleanse, and moisturize your skin. The lavender’s monoterpenes work its anti-inflammatory magic on your body while the scent calms your spirit. And the mineral-laden sea salt boosts the hydration effects of the oats and balances the minerals in your skin.

Dahling, you can, and deserve, to have ALL this opulence in a few minutes. I hope you are luxuriating and tending to yourself during this next stretch of staying at home.

IMG_6840.JPG

Recipe Type: Easy

Servings: 2 bath satchels

Time: 10 minutes

Ingredients

1/2 cup of rolled old-fashioned oats

2 teaspoons of dried whole lavender or 1 teaspoon of dried lavender powder

4 tablespoons of sea salt

2 Coffee filters or large paper tea filters

Kitchen twine or string

Lavender essential oil

Small bowl

Instructions

In a food processor, pulse ½ cup oats and two teaspoons of whole lavender until the mixture becomes a fine powder (if you’re using already crushed dried lavender powder, pulse only the oats).

Add the oats, lavender, and four tablespoons of sea salt into a small bowl. Stir to combine the ingredients.

Split the mixture into two, and scoop into the two tea or coffee filters. If using a coffee filter, gather the edges and tie them together towards the edge with a piece of string. If using a paper filter, tie the bag towards the top with string. Make sure to leave ample space in the bag so the mixture can move around and steep into the bath better.

Voila, you’re finished!!!

How to Use

Draw a bath, and add the satchel when the tub is nearly full, keeping it away from the water stream. Swirl the bag gently to encourage the oat milk to get into the bath, take care to avoid ripping the bag. Then, add four-five drops of lavender oil to the water.

While the tub is filling, light some candles, turn on your favorite podcast, make a mug of herbal tea, and apply a face mask. Sink into the tub and relax.

Whole Artichoke & Creamy Gochujang Sauce

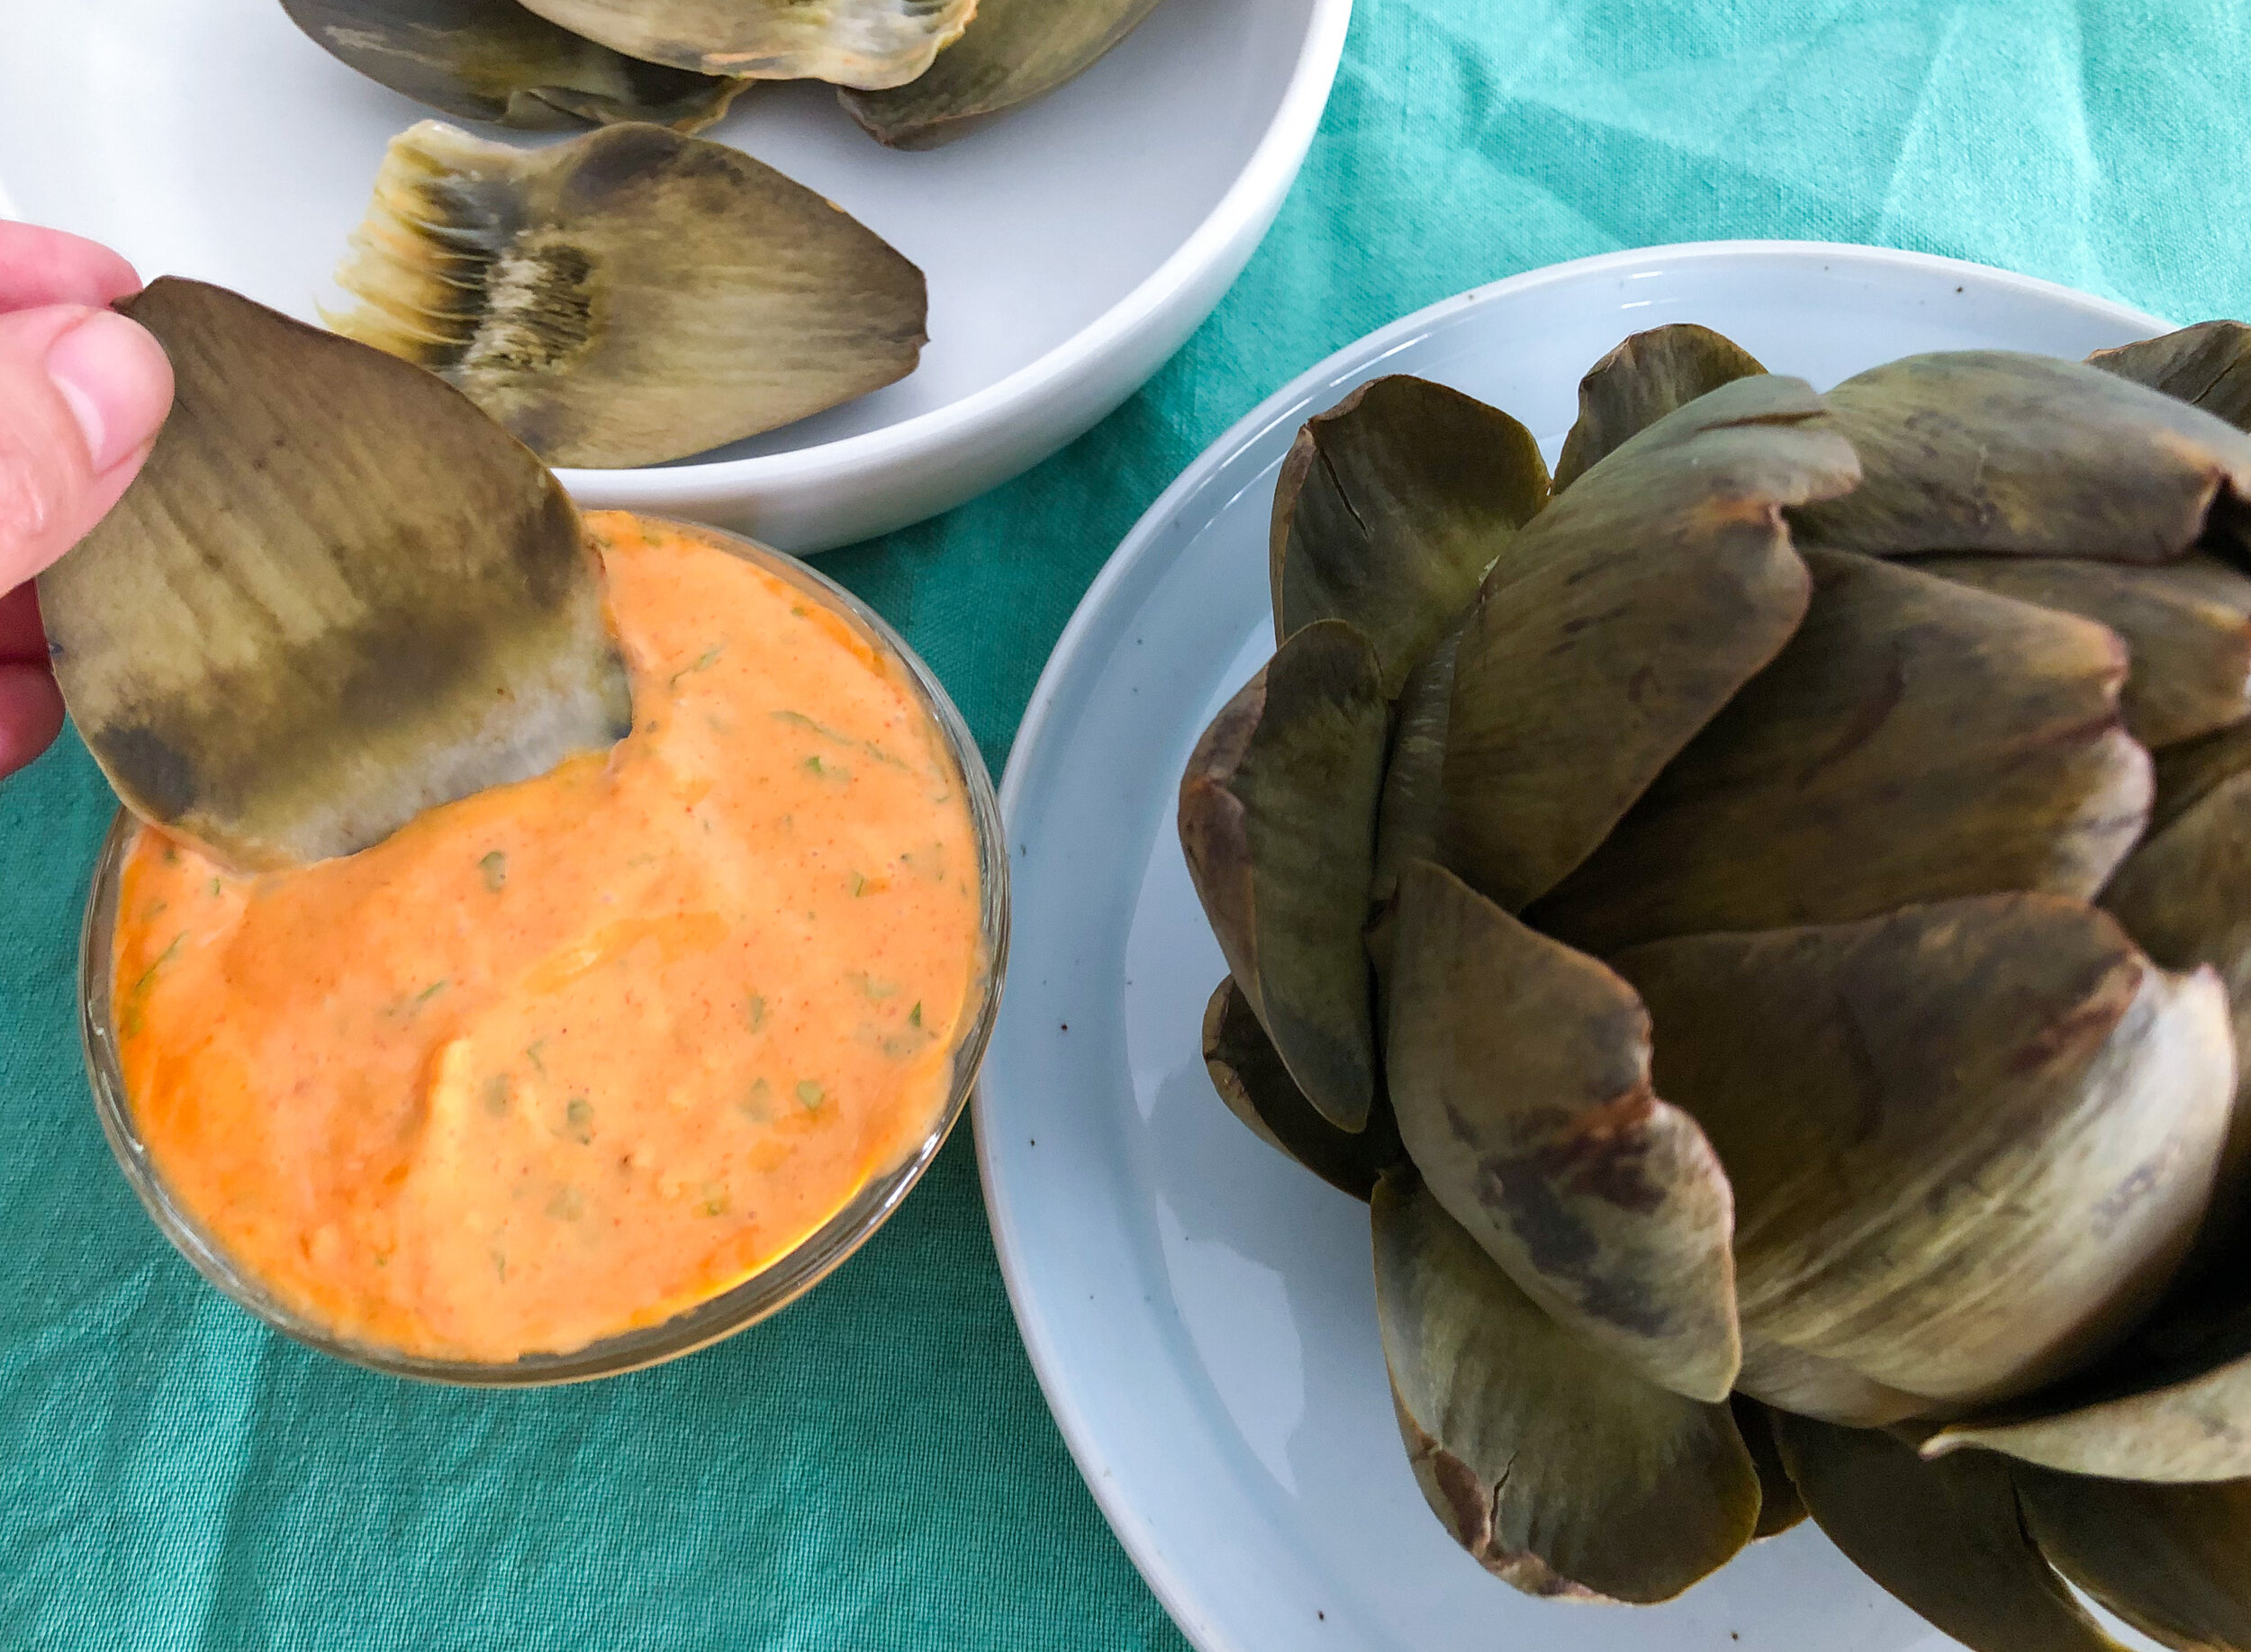
Putting out a whole artichoke as a nibble for an apéro or happy hour is delicious and serves all of the drama, dahling. However, contrary to what she's serving, this recipe is deceptively simple. To have an enjoyable whole artichoke experience, I think it's essential to pair this prickly queen with a creamy dipping sauce—for opulence. Use the leftover gochujang sauce during the week and drizzle it on roasted veggies, spread it on sandwiches, or however else you please. 

IMG_5401.JPG


Recipe Type: snack or appetizer

Time: 1-1.5 hours

Servings: 2-4

Ingredients

1 large artichoke 

½ cup of mayonnaise (preferably homemade)

1 tablespoon gochujang

1 teaspoon soy sauce

1 teaspoon sesame oil

One lime

One lemon

2 tablespoons finely chopped cilantro (including stems)

2 tablespoons finely chopped scallions

Sesame seeds

Salt and Pepper to taste

Equipment

Pot to cook the artichoke

Mixing bowl

Knife

Cutting board

Microplane

Instructions

  • Bring a pot of water, large enough to submerge the artichoke, to boil. Cut a lemon in half and squeeze both halves' juice into the pot and add the two lemon halves. When the water is boiling, add a generous amount of salt (like salting pasta water).

  • Wash the artichoke, then remove the stem by placing the artichoke on the counter, holding it to the counter with one hand, and using your other hand to press down forcefully on the stem to snap off the base. The stem should snap off along with some of its fibrous veins in the stalk, leaving the bottom of the heart exposed. Immediately add the artichoke to the pot of water.

  • Lower the heat so the water is at a simmer, and cook the artichoke until the bottom of the heart (the opening where the stem once was) becomes tender, and you can easily pierce it with a paring knife or cake tester. This will take anywhere from 45 minutes to an hour and a half depending on the artichoke size.

  • While the artichoke is cooking, prepare the dressing. I strongly recommend using homemade mayonnaise (the recipe and instruction videos are here).

  • In a small mixing bowl, add ½ cup of mayonnaise, one tablespoon of gochujang, one teaspoon soy sauce, sesame oil, one teaspoon of lime zest, the juice of ½ the zested lime, and two tablespoons of chopped cilantro and sliced scallions.

  • Mix, add salt, pepper to taste. If needed, add more lime juice to balance the acidity in the sauce. Place the sauce in a serving dish and garnish with toasted sesame seeds.

  • When the artichoke has cooked, pull the artichoke out of the boiling water with tongs letting the excess water drip back into the pot. Plate and serve with gochujang cilantro sauce.

How to Serve

  • Serve the hot cooked artichoke with the dipping sauce. Serve with a bowl to discard artichoke leaves.

  • Eat by removing a leaf from the artichoke and dipping the base (not the pointy side) into the sauce. Scrape the bottom flesh off with your teeth.

  • Enjoy all the leaves until you get to the heart/choke. You'll notice the leaves get thinner until you reach the choke with long inedible fibers. Scrape off the inedible choke with a spoon, discard the choke, and then cut the heart of the artichoke into little pieces, dip into the sauce, and enjoy!

IMG_6410.jpg
IMG_6411.jpg

Spaghetti and Meatballs

I rarely needed to make meatballs and red sauce in NYC, but it was always a special occasion food and a weekend project to look forward to when I did. I would go to Paisano's or Fleisher's butchers to get some high-quality beef, pick up some crusty bread, and cook while listening to a podcast or NPR. I'd make the meatballs, sear them up, and finish them in a simple red sauce. Then, we'd have friends come over to tuck into the pasta.  

I was hesitant to write a recipe because I'm not Italian, and I don't want to be appropriative. But, folks reach out to request the recipe when I shared stories of it on IG. I want to be clear that this is my interpretation and instructions of a classically Italian-American dish that draws from many wonderful Italian cookbooks, chefs, restaurants, and friends. I hope to share what I've learned from these wonderful traditions and voices in a respectful and not appropriative way. The most impactful inspiration to my current version of meatballs comes from the meatballs served at Frankies 457 in Brooklyn; they're huge, juicy, and come three to a small plate piled with red sauce filled with pine nuts and raisins. I'll always remember how succulent and juicy the meatball was, how the raisins had plumped in the juices to add a touch of sweetness to each bite, and how the pine nuts added savory morsels of opulence. The version of meatballs and red sauce that I make today, in 2020, has evolved over a couple of decades of making this dish. It might be one of the foods that I first learned how to cook, a food that I have a history with, and is incredibly comforting and reminds me of friends and family. You can read part two about Spaghetti and Meatballs in the November newsletter coming out tomorrow. If you haven't already, subscribe!

This recipe makes 18 meatballs, which can serve up to six people. You can split the recipe in half. Or, cook the full recipe and freeze a portion of it for up to two-months. Thaw the sauce in your fridge overnight and reheat over medium-low heat for 20-30 minutes. I like to make the whole batch at once and eat the meatballs throughout the week in various iterations: on a sandwich with melted cheese, alongside vegetables, or with pasta.

IMG_5823.JPG

Recipe Type: Dinner/project 

Time: 2.5-3 hours

Servings: 6 servings

Ingredients

Meatballs

¼ cup pine nuts

½ cup of bread crumbs or 1½ cup of day-old bread (any kind) with crusts removed torn or cubed into 1-inch pieces

½ cup of milk

2 lbs or 900 grams of ground beef with about 10% fat 

One medium onion diced into ¼ inch pieces 

4-5 cloves of garlic finely chopped

¼ cup of chopped parsley

½ cup of golden raisins

One tablespoon zest from an orange or a lemon

Three eggs

½ cup of grated Parmesan or Pecorino cheese

One teaspoon freshly grated nutmeg

Salt and pepper 

1 cup of neutral oil for frying 

Red Sauce

One medium onion diced into ½ inch pieces

4-5 garlic cloves minced

Two 28-oz cans of whole peeled plum tomatoes

One teaspoon oregano

One teaspoon crushed red pepper

Olive oil

1-2 teaspoons granulated white sugar

Two one-pound packs of spaghetti

For serving

Finely chopped parsley

Parmesan for grating on top of the pasta

A big green salad

Equipment

Mixing bowls

Measuring cups

Chopping board/knife

Frying pan or skillet

Large pot for boiling pasta

Large heavy-bottomed pot for red sauce

Tongs

Small sheet tray

Instructions

Preparing meatballs is one of those meditative tasks that takes a little bit of practice to master. Take it easy and be kind to yourself if this is your first time making them. They're kind of like learning how to fold dumplings. The more you do it, the better and faster you'll get at making them. Think of this as an opportunity to listen to your favorite podcast or an audiobook while you're cooking. For an enjoyable time in the kitchen, set yourself up for success by reading through the instructions before cooking, preparing your mise en place, and cleaning as you go!

Toast Pine Nuts and Soak Bread Crumbs

  • Place the pine nuts on a small sheet tray and toast in a preheated 350℉ 175℃ oven and set a timer for 4 minutes at first and keep adding a minute to the time until they're lightly golden and fragrant. Keep your eye on the oven because the nuts will go from toasted to burned in seconds. Pull from the oven and let cool on a wire rack.

  • Soak bread crumbs or the cubed or torn bread into the milk in a bowl for around 5-10 minutes.

Meatballs 

IMG_5771.JPG
  • Add the ground beef to a large mixing bowl.

  • Peel two onions and toss the skins. Chop the first onion into a ¼ inch dice for the meatballs into the mixing bowl with the meat. Chop the second onion (for the gravy/sauce) into a ½ inch dice and set aside in a small bowl.

  • Mince 8-10 cloves of garlic. Add half of the garlic to the mixing bowl with the meat, and set aside the other half in a small prep bowl.

  • Mince ½ cup of parsley, add half into the mixing bowl with the meat, and reserve half in a small prep bowl for garnishing later.

  • Chop half of the raisins into smaller pieces and leave the rest whole. Add all of the raisins to the mixing bowl with the meat mixture along with one teaspoon of grated nutmeg, one teaspoon orange zest, the toasted pine nuts, two eggs, ½ cup of grated parmesan, one teaspoon of grated nutmeg, and soaked bread or bread crumbs. If you've soaked the cubed bread, crumble the bread into small pieces (the size of peppercorns) and add to the meat mixture along with the residual milk.

  • Season with one tablespoon of kosher salt (adjust to half a tablespoon if you're using table salt) and 8-10 grinds of fresh pepper (or around one teaspoon of pepper).

  • Mix the meat mixture by hand for 2-3 minutes until thoroughly combined.

  • Heat the skillet and add a ½ inch layer of oil to the bottom of the pan. Take one teaspoon of meat and form it into a little hamburger patty. When the oil heats up, fry it until cooked, and taste it for seasoning. You'll most likely need to add more salt. Make another patty and fry it to taste the seasoning, and continue doing that until seasoned to your liking. Turn off the skillet while you form the meatballs.

  • Using a ⅓ cup measuring cup, scoop ⅓ cup meat portions into your hand and tightly form into round balls. Place on a baking sheet.

  • Heat the skillet, and when the oil is hot (when you place a meatball in the oil, it should have a nice sizzle), fry the meatballs in a pan, taking care not to overcrowd the pan. Leave 2-3 inches around each meatball. Let each face of the meatball sear and get a deep brown crust. Once one part of the meat gets a crust, I like to use two spoons to gently roll the meatball onto another face of the ball to sear that side and do that until all the meatball sides are seared.

  • Getting a good sear on the meatball is crucial to adding flavor and preventing it from falling apart in the sauce. You don't need to worry about cooking the meatball all the way through because it will finish cooking in the sauce.

Sauce

  • In a large heavy-bottomed pot (I use a 7-quart Dutch oven to prevent the sauce from burning), add 3-4 tablespoons of olive oil and heat the pan. Once the oil is hot, add the reserved ½" diced onion for the sauce and cook for two minutes or until they become translucent. Then, add reserved minced garlic and cook until the garlic is fragrant and translucent (a minute or two). Take care not to brown the onion or garlic.

  • Add one teaspoon of crushed red peppers and toast for 30 seconds or so.

  • Add one teaspoon of oregano to your palm and rub your hands together over the pot to release the oils. Add the oregano to the pot.

  • Add the canned tomatoes by taking the tomatoes two at a time and crushing them and breaking them into tiny pieces with your hands over the pot. Then add the liquid from the cans and rinse out the cans with some water and add that rinsed tomato water to the pan. Add one teaspoon of sugar and a generous pinch of salt, and 3-5 grinds of pepper. Bring the sauce to a boil, then lower to a gentle simmer.

  • Simmer for 30 minutes over medium-low heat. You want the sauce to have a gentle and consistent boil. Stir it every 5 minutes or so to make sure it's not scorching or sticking to the bottom of the pan.

  • After the sauce has cooked for 30 minutes, lower the heat slightly, gently add the meatballs into the sauce and cook for 30 more minutes. Stir occasionally to make sure the sauce isn't sticking to the bottom of the pan.

  • Bring a pot of water to boil, and keep it hot on the stove over low heat. During the last 10 minutes of meatball cooking, cook the spaghetti for two minutes less than the suggested time. Before draining the pasta, save one cup of pasta boiling liquid (I use a measuring cup and scoop from the pot), then drain the spaghetti in a colander in the sink.

  • Immediately add the pasta back to the same pot plus half a cup of pasta water. Spoon in a cup or two of sauce (no meatballs) and cook the pasta, sauce, and pasta water, stirring gently together until cooked al dente. The pasta will continue cooking and absorbing the liquid.

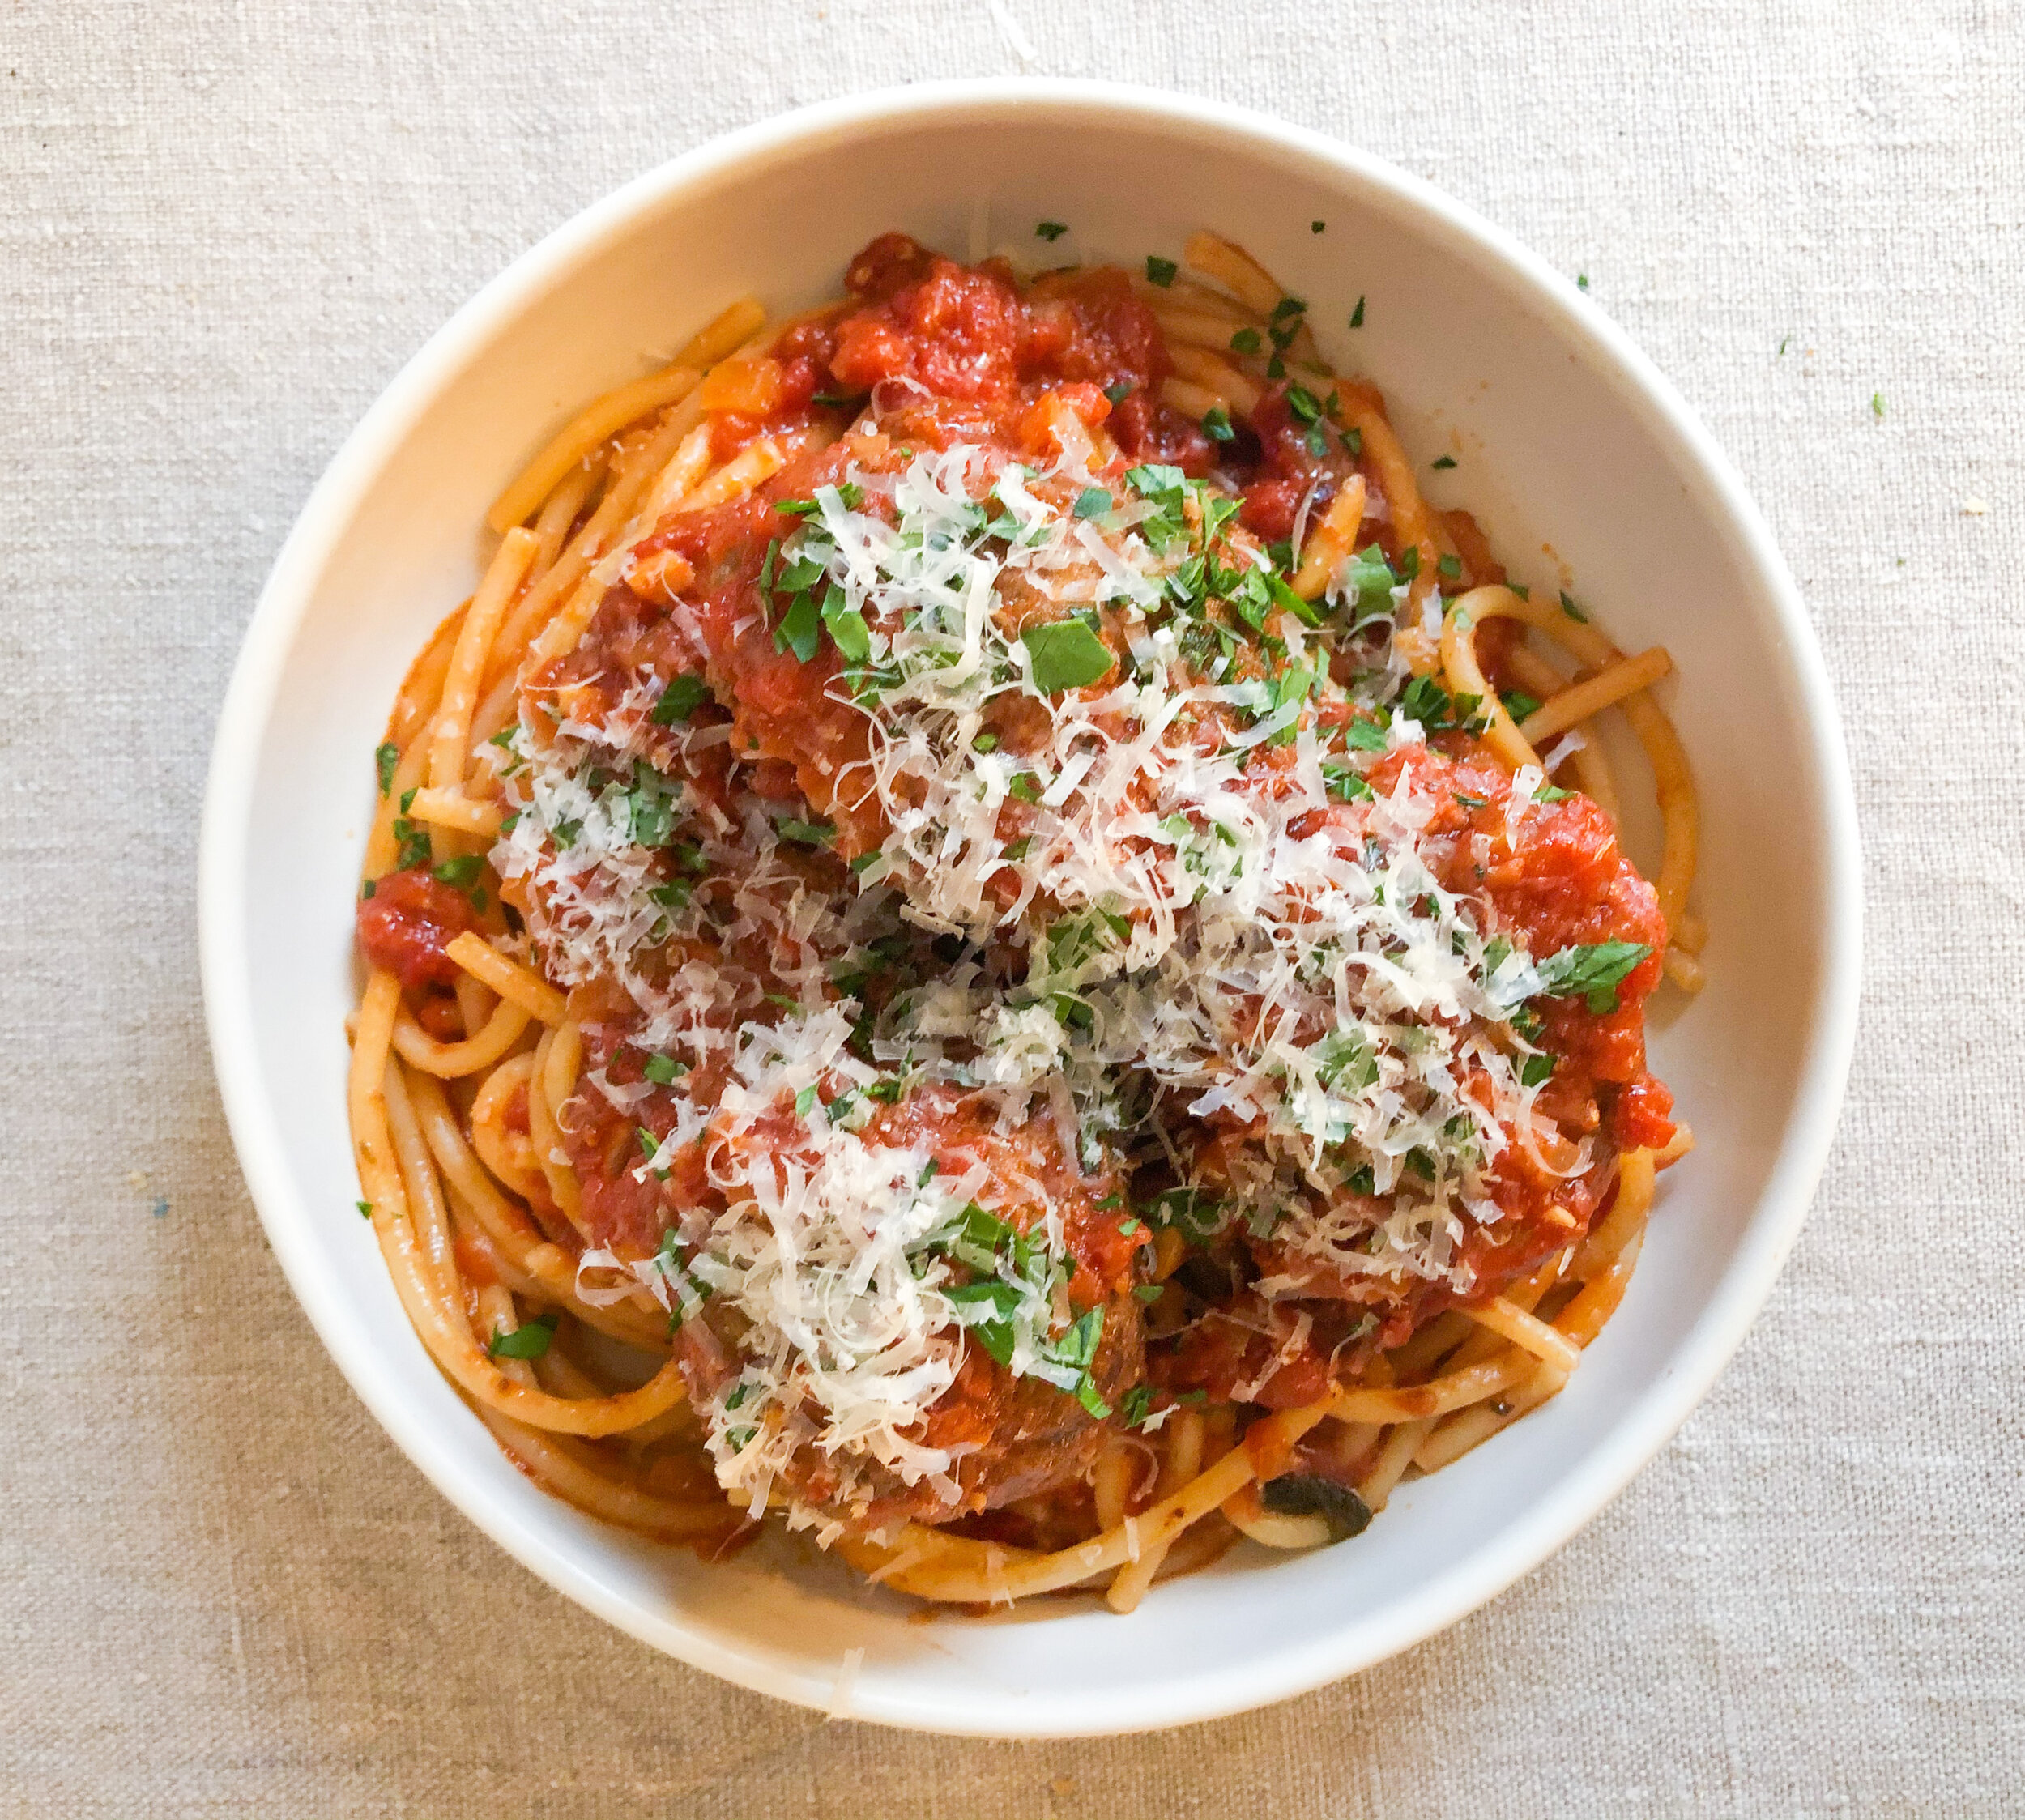
  • Add more sauce and pasta water as you need to have a nice glossy sauce. Remove from heat, add to a large pasta bowl or individual bowls. Ladle more sauce on the pasta and place the meatballs on top. Garnish with chopped parsley.

How to Serve

  • Serve family-style or in individual bowls. I like to serve three meatballs per person.

  • Serve with crusty bread and a big green salad.

IMG_5784.JPG

Cabbage and Cod Salad (Salade de Chou et Cabillaud)

This recipe is inspired by one of the entrées from our meal at Limmat, a v hip restaurant that seems to attract le cool (privileged) kids of Marseille. Limmat is located quite literally in the middle of a grand concrete stairwell that’s embellished by ornate street art. Climbing the staircase will direct you to the artsy Cours Julien. We arrived at the restaurant around nine after a long day of swimming and boating at les Calanques. Exhausted from the sun, sea, and pastis, I was barely lucid and sipping on more pastis when this salad arrived, I didn’t pay much attention to her as she looked like a beige cole slaw. But when I tasted it, I was shook and taken aback by the contrasts in textures and flavors—the crunchy cabbage and carrots juxtaposed by the tender flaked fish; the creamy dressing that wasn’t flat or bland tasting, but vibrant and bright. I was surprised at how fresh, savory, rich yet refreshing, and crunchy this cabbage salad was. It was just the dish I needed after a long day in the sun, and a wonderful start to our meal. 

I recreated this salad shortly after coming back to Paris to recapture that Marseille moment. I opted to use a beautiful red pointed cabbage (for the drama, dahling) and made a bright, creamy sauce with coriander seeds, lime juice, and zest. I added fresh herbs, julienned carrots, and poached cod, let her sit for a couple of hours, then served her as a fabulous side to dinner. Since cabbage is in season in Paris, New York City, and other similar climates, this is the perfect opportunity to pick one up…and maybe a bottle of pastis.

IMG_5289.JPG

Recipe Type: side or starter

Time: 30 minutes plus at least an hour to rest

Servings: 4-6

Ingredients

½ red cabbage (I used a pointed red cabbage)

2 carrots

½ medium red onion or 1 small red onion

Handful of cilantro

1 lime

½-¾ cup of homemade mayo

2 teaspoons apple cider vinegar

1 clove garlic

Cayenne or piment d'Espelette

2 scallions or 2 tablespoons finely chopped chives

150 grams or 5 oz. cod filet

Equipment

Knife

Cutting board

Mandolin (optional)

Small pot

Mixing bowls

Instructions

Prepare Mise en Place

  • Wash cabbage, carrots, cilantro, and scallion or chives. Peel onion, garlic, and carrots. 

  • Set up your cutting board, garbage bowl, and mixing bowls; set out the ingredients you’ll need. 

Prepare the vegetables for slaw

  • Cut the half cabbage piece in half, or into quarters, and cut the core out by slicing above it on the diagonal. Cut the half cabbage into ⅛ inch shreds using a knife or a mandoline and place sliced cabbage into a large bowl. 

  • Chop onion in half and slide crosswise into ⅛ inch half-moon slices. Julienne carrots. Chop a handful of cilantro (including stems) reserve a few leaves for garnish. Slice scallions or chives into ⅛ inch pieces. Add all these ingredients to the large bowl with the cabbage.

Assemble the dressing

  • Bring a small pot of water to a simmer over medium high heat while you assemble the dressing (for the cod). 

  • Because this dish is so simple, I think it’s essential to use homemade mayonnaise. You can find the recipe and instruction video here

  • In the same bowl as the homemade mayo (or if you’re using store bought mayo add ½-¾ a cup to a bowl). Whisk in the juice of one lime (around two tablespoons), one teaspoon lime zest, one tablespoon of apple cider vinegar, salt and pepper to taste, a pinch of cayenne pepper (or piment d'Espelette), and two gluggs of good quality olive oil.

  • Whisk the dressing together and taste it. Then adjust seasonings to your preference. 

  • Set aside

Poach the Fish

  • When the water is simmering slightly (you can see a few bubbles), salt the water, and drop in the cod. Poach for two to four minutes until it’s cooked. 

  • You can see if the fish is cooked when you insert a knife or cake tester into the center of the filet and you feel no resistance in the flesh. FYI-Cooking fish is one of the most difficult things to master in cooking, so give yourself a pat on the back for doing this.

  • You can also pull out the fish, put it on a plate and pull apart the meat of the fish in the center (since we’re gonna flake it later anyway). If the meat is opaque and white and a knife easily pierces it with no resistance, then it’s cooked. You should also feel the blade of the knife and it should feel warm (which means the fish is warm inside as well). If the fish is raw if the flesh will feel firm and look translucent. 

  • Let the fish cool on a plate. Then cover and put into the fridge until ready to serve.

Assemble the salad

  • Add the dressing to the cabbage and toss with tongs. Let sit for at least an hour and up to four. Toss every 20 minutes or so. As the cabbage sits, it will wilt a bit and soak up the sauce. 

  • Right before serving, break the fish up into flaky pieces and place in the salad. Give everything a quick toss and add it to a serving bowl. Garnish with fresh cilantro and scallions/chives. 

Pumpkin Bundt (or Loaf) Cake With Orange Cardamom Glaze

Hello, angels! As promised in my October newsletter (did you miss her? Read her here, and make sure you get the next one by signing up!), here is a cozy little recipe using the homemade pumpkin purée technique I shared last week! This bundt cake is essentially a pumpkin spice cake, or pain d’épices en français, and has all the cozy spices (nutmeg, clove, cinnamon) you want in the fall. It also has orange zest to brighten the flavor and the queen of spices, cardamom, to add elegance. The cake is robed in a cardamom orange glaze that envelopes the beauty-bundt in a citrusy sweet embrace. Don’t have a bundt pan? No worries, I’ve also included a loaf cake recipe with a crackly sugar crust so you don’t have to miss out. 

IMG_5565.jpg
IMG_5475.JPG

Recipe Type: Cake

Time: 1

Ingredients

Bundt Cake Ingredients

320 grams fresh homemade pumpkin purée or ¾ of a 15-oz can of Pumpkin Puree 

3 large eggs at room temperature

100 grams water or ½ cup

160 grams neutral oil or ¾ cup + 1 tablespoon (sunflower, canola, grapeseed) plus extra oiling pan

150 grams or ¾ cup white sugar 

150 grams or ¾ cup brown sugar 

320 grams or 2½ cups all purpose flour

1 teaspoon baking soda

1 teaspoon baking powder

5 grams or 1 teaspoon of kosher salt 

1 teaspoon vanilla extract

1 teaspoon ground cinnamon

½ teaspoon freshly grated nutmeg

⅛ teaspoon ground cloves

1 teaspoon orange zest grated on a microplane

⅛ teaspoon ground cardamom

Orange Cardamom Glaze

1 cup of confectioner’s sugar

⅛ teaspoon ground cardamom

1 teaspoon orange zest grated on a micro-plane

3-5 tablespoons juice from the zested orange

5 grams or 1 teaspoon of kosher salt 

Loaf Cake Ingredients

212 grams fresh homemade pumpkin purée or ½ of a 15-oz can of Pumpkin Puree 

2 large eggs at room temperature

75 grams water or ¼ cup plus 2 tablespoons

120 grams neutral oil or ½ cup(sunflower, canola, grape seed) plus one teaspoon for oiling pan

100 grams white sugar or ½ cup

100 grams brown sugar or ½ cup 

2 tablespoons raw turbinado sugar or 1.5 tablespoons of white sugar

245 grams all purpose flour or 1 ¾ cup + 1 tablespoon 

1 teaspoon baking soda

½ teaspoon baking powder

1/2 teaspoon of kosher salt 

1 teaspoon vanilla extract

1 teaspoon ground cinnamon

½ teaspoon freshly grated nutmeg

⅛ teaspoon ground cloves

1 teaspoon orange zest grated on a micro-plane

¼ teaspoon ground cardamom 

Equipment

Mixing Bowls

Whisk

Silicone spatula

Loaf Pan 8x4 or 9x5 or 10 or 12 cup bundt cake pan

Pastry Brush

Baking paper

Microplane

Recipe Tips

  • Here is a tutorial for how to make homemade pumpkin purée. Trust and believe, it’s so fabulous and not at all difficult.

  • A measuring tip: When weighing ingredients, make sure to scale them in smaller bowls before transferring them into the larger mixing bowls with the rest of the ingredients. That way if you make an error, like adding too much flour, it’s self-contained. If possible, invest in a scale and measure ingredients by weight. It’s the most accurate way to measure.  

Instructions

  • Preheat the oven to 180℃ 350℉. If you are baking with a dark baking pan, then lower the temperature by 5℃ 25℉.

  • In a medium mixing bowl, add the dry ingredients (flour, salt, baking powder, and baking soda)  and whisk to combine thoroughly.

  • In another larger mixing bowl, add the eggs, oil, pumpkin purée, one teaspoon of orange zest, water, brown and white sugar and whisk together. Then, add the spices and vanilla and whisk once more.  

  • Add the dry ingredients (flour, baking soda, baking powder, salt) into the large bowl with the wet ingredients and whisk together until just combined. 

    • For the bundt pan, brush the pan with oil and sprinkle 1-2 teaspoons of flour in the pan and shake the flour in the pan (over the sink) to lightly coat the inside of the bundt pan. 

    • For the loaf pan, brush the pan with oil and line with parchment paper. Brush the parchment paper with oil. 

  • Place the bundt or loaf pan on a parchment lined baking sheet and pour the batter into the pan. 

    • For the loaf cake, sprinkle turbinado sugar evenly on top (it’ll form a nice crackly crust). If you don’t have turbinado sugar, sprinkle white granulated sugar. Then, using a small knife, draw a line down the center of the loaf lengthwise leaving 1-2 inches on each side. Then pour a little bit of oil using a spoon or squirt bottle down that line. This will enable the bread to crack down that line of oil and puff up beautifully. If you want to glaze the cake, omit the sprinkle of sugar on the cake. 

    • For the Bundt cake, make sure you fill the pan ¾ of the way so that it doesn’t overflow. I tested this recipe in a 10 cup Bundt and had just enough batter. In the event you have extra, save it and make muffins. 

  • Bake the cake (both pans) for 50-70 minutes depending on your oven. Make sure to rotate the pans 25 minutes into baking to ensure even cooking. Check the loaf and cake starting at 45 minutes for doneness. The loaf is ready when a sharp knife, cake tester, or toothpick  inserted into the center of the loaf or the center of the cake comes out clean. 

  • Prepare the glaze: while the cakes are baking, add one cup of confectioners sugar into a small mixing bowl with the ground cardamom, salt, and orange zest. Slowly whisk in the orange juice 1 tablespoon at a time until the glaze has the consistency of runny honey. 

  • When ready, remove the cake from the oven, and let cool in the pan for 10 minutes. Then remove from the pans and let cool on a wire rack. 

    • For the loaf cake run a sharp knife along the edges of the cake to release it from the pan. With some clean kitchen towels, remove the loaf from the pan and let cool on a wire rack. Let cool for one hour and enjoy! If you want to glaze the loaf cake, then pour the glaze on top of the loaf after one hour. 

    • For the bundt cake place a wire rack on top of the cake, and gently invert the cake. It should come out easily. Let cool for one hour, then pour the orange cardamom glaze on the cake on the wire rack set on top of a baking sheet (to catch the drippings). 

  • The cakes benefit from sitting for a day, but if you’re impatient like I am, then feel free to dig in!

Homemade Pumpkin Purée

Happy Wednesdays, dahlings!

Here’s a cute two and a half minute video on how to make homemade pumpkin purée for baking and savory dishes. Also, a friendly reminder that the October newsletter goes out tomorrow. Sign up so you don’t miss it!

Salad D’automne: Roasted Fall Butternut Squash Salad 

Roasted fall butternut squash salad is a hearty, savory, and fabulously easy dinner or side dish. When cooking vegetable-forward dishes or meals, I want them to be satiating and delicious. This salad maximizes flavors and textures from the ingredients by simply roasting or boiling the main ingredients. The roasted squash and onions have concentrated flavor and umami-packed browned bits while the cooked French lentils add a creamy and hearty bite. Dill + red wine/sherry vinegar give this salad a pop of brightness, and a generous drizzle of lovely olive oil adds some luxury and opulence. Serve this salad d’automne with some crusty sourdough bread for an easy and delicious fall meal.

2020-09-16 Lentils .jpg


Recipe Type: Vegan Meal or Side

Time: 1 hour

Servings: 4 as a side 2 as a main

Ingredients

Two cups of cubed butternut squash (1 small whole squash)

½ cup French lentils (lentilles du puy)

8 small onions (such as cippolini or spring onions if available) or 1 yellow onion

A handful of fresh dill and chives (sage can be a great substitute)

1 tablespoon maple syrup

Salt and pepper

Red wine or sherry vinegar

1 clove of garlic

Neutral oil (grapeseed or sunflower)

Olive oil

Equipment

2 Baking sheets

Y Vegetable peeler

Medium or small pot

Knife and cutting board

Fine Mesh Sieve

Parchment paper

One medium or large mixing bowl

Microplane

Instructions

  • Preheat the oven to 400℉ or 205℃. Prepare the squash by cutting off the top and bottom of the squash, peel the squash with a sharp vegetable peeler, discard the peels, then cut the squash lengthwise. Scoop out the seeds (you can clean and roast them to snack on if you’d like), and dice the squash into ½ inch pieces. 

  • Toss the diced squash in 2 tablespoons of neutral oil, a generous sprinkle of salt, and maple syrup. Place on an even layer on a parchment sheet lined baking sheet and set aside. 

  • Clean the onions by removing the skins and trimming off the roots. Cut into halves or quarters if you have small onions or dice a large one into 1 inch cubes. 

  • Toss in one tablespoon of neutral oil and a generous pinch of salt. Place on another parchment paper lined baking sheet cut side down. 

  • Roast the squash and onion for about around 30-45 minutes until the squash becomes tender browns at the edges and the onions char on the edges. Give the squash and onions a stir in the middle of cooking to promote even roasting and change the position of the vegetables in the oven. 

  • Bring a medium or small pot of water to boil. When boiling, add lentils and lower to a simmer. Cook gently until the lentils are tender (around 30-40 minutes). Taste them to test for doneness.

  • When they are cooked to your liking, drain the lentils in a sieve and add them to the mixing bowl.

  • While the vegetables are roasting and the lentils are cooking, wash the dill and chives and set aside. Reserve a few dill fronds for garnish. 

  • Once the vegetables have roasted, place them into the mixing bowl with the lentils.

  • Chop the dill and chives and add to the mixing bowl.

  • Grate one clove of garlic with a microplane directly into the bowl (if you don’t have a microplane finely chop the garlic after chopping the herbs). Add two glugs of olive oil and about one tablespoon of red wine or sherry vinegar for acid. Add freshly ground pepper and season with salt to taste. 

  • Garnish with dill fronds and serve warm or at room temperature with some crusty sourdough bread. 

Cauliflower Sandwich

It's cauliflower season, and I want to be more inclusive to my vegan readers and share a fabulous sandwich that's easy to scale up or down for a quick dinner or a feast with friends. I like to roast a whole cauliflower broken into florets to concentrate the cauliflower's flavor. When roasted, the cauliflower will get browned and crispy on the edges and soft and tender in the center. Before preparing the ingredients, I make the dough for homemade chapati, a flatbread that my friend Maya taught me how to make (check out her Brika recipe). While the dough is rising, I cook the cauliflower and assemble the vegetables for the sandwich. When it's time to eat, I cook the bread, and place everything on the table to serve family style so that everyone can help themselves: a large plate of veggies for garnishing (and texture), the roasted cauliflower, warm bread, tahini dressing, olive oil, harissa, and salt/pepper. To make this sandwich into a feast, simply serve with a large green salad, houmous, and eggplant caviar/baba ganoush with some sliced carrots and cucumbers for dipping. 

In case you missed it, here’s my first monthly newsletter that went out last week. You can stay up to date on all things Le Dinner Party by subscribing!

IMG_2018.jpg

Recipe Type: Vegan, Sandwich

Time: 1 hour

Servings: 

Ingredients

1 large head of cauliflower

1 lime or lemon

2 cloves of garlic

Red onion

Cucumber

¼ head of crispy lettuce of your choice

Harissa or any other hot sauce of your choosing

½ cup of tahini

Olive Oil

Neutral oil (I use sunflower or grapeseed)

Salt and pepper 

Any combination of fresh tender herbs; I love to use dill, scallions, mint, and cilantro or parsley

2-3 pieces of flatbread for each person 

Equipment

Baking sheets

Food processor

Microplane

Instructions

Prepare Bread

If you're making homemade bread, prepare the dough before cooking the cauliflower.

Roast Cauliflower

  • Preheat the oven to 400℉ or 205℃.

  • Remove the outer green leaves of the cauliflower, and cut the cauliflower into approximately two-inch florets. I like to keep the stem and slice it into ¼ inch disks and roast them with the florets. 

  • Wash and drain cauliflower.

  • Place the drained cauliflower into a large bowl and add 2-3 tablespoons of neutral oil, a generous sprinkle of salt. Toss to coat, and place in an even layer on a baking sheet. Roast until browned at the edges and tender when pierced with a knife (20-40 minutes depending on your oven). 

  • Remove cauliflower and pour a couple of tablespoons of olive oil on top and add a splash (around 1 teaspoon) of acid red wine vinegar or lemon/lime juice. Toss to combine. When ready, place the cauliflower in a serving bowl covered in foil to keep warm. 

  • You can prepare the cauliflower ahead of time and keep warm in the oven at 200℉ or 95℃.

Mise en Place and Garnishes

While the cauliflower is roasting, assemble the rest of your ingredients and set up your mise en place. 

  • Wash lettuce and herbs.

  • If necessary, Trim dead parts off of the herbs and place onto a serving plate.

  • Cut lettuce into thin slices horizontal to the root to make shredded lettuce or shrettuce and add to a serving plate.

  • Peel the red onion and slice into half-moons, slice cucumbers into rounds or half-moons, and if you have scallions, cut into ⅛" pieces. Place on a serving plate.

  • Roughly chop 2 cloves of garlic and set aside. 

  • Roughly chop a little bit of all the herbs you're using so that you have around ¼ cup for the tahini dressing. 

Prepare Tahini Dressing

  • In a food processor, add the 2 cloves of roughly chopped garlic, and pulse a few times to mince. 

  • Add ½ cup of tahini, ½ teaspoon of lemon zest, and the juice of ½ a lemon or lime, and the chopped herbs. 

  • While running the food processor, drizzle in around ¼ cup of water (more or less depending on how loose you want your dressing) to make a silky dressing. 

  • Season with salt, pepper, and more citrus juice if you want it to be more tart. 

  • If you don't have a food processor, you can whisk the ingredients together (make sure to mince the garlic rather than roughly chop)

How to Serve

Cauliflower-Fast.gif

Before serving, heat the bread on a pan or in the oven. Place in a clean kitchen towel in a shallow bowl or plate to keep warm. Set all the veggies, herbs, and dressing, and harissa on the table to let guests assemble their own sandwiches. 

100 Day Lacto-Fermented Plum Syrup (Cheongs)

Around July, little sugar plums would emerge at the Brooklyn Prospect Park farmer’s market plump and resplendent in their gold, ruby, and violet skins. Charmed by these gentle nuggets, I began preserving them with a Korean lacto-fermentation method used to make maesil-chung. Maesil-cheong is an extract or syrup made from green unripened apricots that are packed in sugar and left to ferment for 100 days. During this time, the sandy sugar turns into a clear then richly hued liquid. After 100 days, the syrup is ready to strain. The remaining fruit can be used one more time to make a plum flavored liquor.

This is a fabulous low-drama long term fermentation project. During this summer, I’ve made three types of syrup with cherries, green Reine Claude plums, and purple Quetsch plums. And, I’ll most likely make another jar of Quetsch syrup and one with small yellow Mirabel plums before the season ends. I love to burp the jars every few days and taste how the flavors of the syrups changes over time. Although I’m sad to see summer go, I’m excited for the syrups to become ready to brighten up my cooking during the dark and cold winter months.

I’ll share recipes of how to use this beauty syrup in the coming months. I hope you’ll make some syrup with me. Stay in the loop by subscribing to my monthly newsletter!

Recipe Type: Low-drama project

Time: 100 days, plus some light maintenance.

Servings: around ¾ a liter of syrup

Ingredients

~400 grams of firm summer plums (cherries or currants work well too)

~400 grams of white sugar

Optional

1 bottle of vodka or 4 bottles of soju

Equipment

1 sterilized glass 1 liter jar or 1.5 liter glass jar

Scale

Masking tape and permanent marker

Instructions

The ratio of fruit to sugar is 1:1. You can use as much or as little fruit as you want. I’ve written this recipe to fit into a one liter jar. You can scale it up or down as you wish. 

Preservation

Wash, sterilize, and dry a 1 liter glass jar (you can sterilize with boiling water or run the jar through a dishwasher). Then, wash and drain the fruit. Weigh the fruit and add the exact same amount of sugar to another bowl—if you have 453 grams of fruit, you’ll need 453 grams of sugar. Set aside a half cup of sugar to top the fruit later. 

Fill the sterilized jar by layering the fruit and sugar taking care to pack the jar tightly while not damaging the fruit. Add the reserved ½ cup of sugar to the top of the jar at the end so that the fruit is fully submerged in the sugar. If the jar is too full, don’t worry, keep the sugar in a separate jar or bag. Add it to the mixture in a couple of weeks after the sugar has liquefied. 

Set the jar on top of a plate or small baking sheet in a cool part of your kitchen. Label the jar with the date started and the type of fruit you use. Your 100 day wait begins.

Fermentation and Observation

Over the next few weeks the sugar will begin to liquefy. If you have reserved sugar, add it back to the jar when there is room in the jar. Once 80% or so of the mixture is liquid, gently stir the mixture with a long sterilized spoon once a week or so to encourage the sugar at the bottom to liquefy. I like to submerge the fruit on top into the syrup while I’m stirring to prevent the tops of the fruit from getting moldy. You can also use fermentation weights to submerge the fruit under the liquid. I’m too lazy to do that, so I just stir the fruit occasionally. Take care to keep the fruit intact when you stir, and don’t add anything foreign to the mixture. 

Carefully monitor the extract, small bubbles should emerge from the fruit as the sugar liquefies. The bubbles indicate that lacto-fermentation is happening. If there aren’t any bubbles after 4-6 weeks, chances are something went wrong. Toss this batch., it’s not worth the risk of consuming something contaminated. Burp the jar every couple of days depending on how active the mixture is so that pressure doesn’t build up in the jar. This is very important to release the carbon dioxide coming from the syrup so that the jar doesn’t explode. If you’re going to be away for a week, burp the jar, then, stick it in the fridge to slow down fermentation. 

Sample the syrup occasionally with a sterilized spoon (only if there are bubbles coming from the fruit), and notice how the syrup evolves over time. 

Notice the small white bubbles that indicate fermentation is occurring. These were very bubbly and active because they were kept out in warm summer weather.

Notice the small white bubbles that indicate fermentation is occurring. These were very bubbly and active because they were kept out in warm summer weather.

The Final Beauty-Syrup

After 100 days, the syrup will be ready to strain into a clean and sterilized glass jar or bottle. Used in teas, cocktails, mocktails, marinades, and however else you want. 

Optional Step: Make Plum Infused Liquor

You can leave the remaining fruit in the jar and add a bottle of vodka or four bottles of soju. Wait a month or so for the plums to infuse the alcohol. Strain and add to cocktails!

Maya’s Brika: A Celebratory Tunisian Pastry 

Maya—A REGAL Queen!

Maya—A REGAL Queen!

Maya’s Brika

Maya’s Brika

You can learn a lot about someone when cooking together: how they communicate, share, give/take feedback, and occupy space. I've had the pleasure of cooking professionally and casually with folks from all over the world. Each experience requires observation, receptiveness, calibration, and understanding. Yet, with Maya—Parisian friend of Tunisian descent & REGAL Queen—cooking together is comfortable, as if we'd been sharing a kitchen for years. Perhaps it's the shared experience of navigating our first-generation third culture kid lives; the stories we share to keep the connections to our ancestral homes that our families left behind in search of opportunities. Or, the realization that despite vast geographic and cultural differences, both Tunisians and Koreans love the spice and acidity that harissa/pickled chilis and kimchis provide to balance a meal. 

Our Tunisian Inspired Feast

Our Tunisian Inspired Feast

During a recent dinner party with Maya and her husband, Andy, Romaine and I decided to make a Tunisian-inspired feast. On the menu: A big green salad, rotisserie lamb shoulder with a liberal sprinkling of ras-el-hanout rouge and summer garlic nestled in teeny incisions in the meat, potatoes and scotch bonnet peppers roasted in the lamb fat, harissa, pickled chilis, Maya’s homemade flatbread (called mlawi or chapati depending on how it’s folded), and brika. Brika (بريك— in Arabic) is a Tunisian triangle-shaped fried pastry with a potato-chip-crispy pastry filled with savory fillings. 

Maya associates brika with Ramadan because her family (and Maghrebi Muslims she knows) breaks their fast with brika and chorba (شوربة‎)—tomato soup with chickpeas and orzo—each night. To Maya, brika represents celebration, family, gathering, and the joys in sharing food with loved ones. Because Ramadan is based on the Hejira lunar calendar, the dates change every year. This year—2020, Ramadan occurred on April 23 - May 23, meaning the sun rose around 4 am and set around 9:30 pm in Paris. During this time, those who are fasting do not drink water or eat any food until the sun has set. When I asked Maya what Ramadan signifies to her, she shared, 

"Ramadan feels like a reset, spiritually and physically. Fasting changes my daily routine so much and makes me feel closer to other Muslims all around the world who are fasting too. I feel this sense of community. Ramadan helps me reflect and learn more about myself; about my relationship to my beliefs and spirituality. I feel closer to my ancestors when I practice something that many have done before me, but the experience is the same. Fasting is a way of getting closer to God and my family, and I realize how thankful I am for all that I have access to in this world. Ramadan is a month of generosity: where you become generous, share your meals, share your money, and share your home to any person in need. The last day of Ramadan is a day of celebration. We gather around food and share it with the neighborhood. After a month of fasting, you begin to truly feel and understand how food is a pure blessing. Even the act of drinking water as you wish is something so luxurious."

Brika is popular in food in France and along the Mediterranean and is consumed year-round. A staple in Maghrabi cuisine, Brika's origins lie in the Maghreb region of Northern Africa (Algeria, Libya, Mauritania, Morocco, and Tunisia). I learned from Maya that the region is often conflated with being Arabic (with influences from the Phonecians, Ottomans, Romans, and French—hello colonization!). This conflation can be considered offensive to some of the indigenous people of the Maghreb—the Berbers (self-named Amazigh). Maya's paternal grandmother was a nomadic Berber, and her family decided to settle in Tunisia. Her grandmother maintained her strong Berber (Amazigh) heritage and signified her pride by pitching a tent in front of their family home to exhibit their nomadic heritage. Maya said, 

"Tunisians have Berber (Amazigh) blood we speak Arabic and practice Islam. We received some of our art and culture from the Arabic and many other cultures, but we are Berbers (Amazigh). Of course we have a rich history. Tunisia is sitting on the Mediterranean."

The dough that is used for brika is called warqet malssouka (ورقة ملسوقة) in Tunisian Arabic and feuille de brick in French. In Tunisia, Maya's family purchases fresh dough from a lady in the neighborhood who makes it to order in about twenty minutes. Malssouka is a distinctive dough that looks like a translucent flexible sheet of paper and is similar to filo, but thinner. This dough is a vehicle for an endless combination of fillings often dependent on familial tradition and regional variation. When fried, brika transforms from a nearly transparent paper-like dough into a delightfully crisp pocket, sturdy enough to withstand its hearty filling. Maya makes a mouthwatering brika with a combination of chicken, potato, various aromatics, and ras el hanout—a regional spice blend that varies according to the shop you buy it from or the family’s recipe. She then places a generous spoonful of filling onto a prepared sheet of dough. Meticulously, she folds the filling into a neat triangle taking care to ensure that the succulent beauty-filling nestles securely within. Finally, she pan-fries these beauty queens until lightly golden. It takes a bit of practice to get the hang of folding brika. While at first it seemed daunting, with each repetition it became easier and more satisfying.

When I make brika, I will think of Maya; how this food is an extension of her family, a record of their history. I will think of Maya and Andy breaking their fast during Ramadan, and Maya’s stories about cooking with her grandma and mom. How making brika is an act of love. To those with whom I share brika, I will consider how to share what I’ve learned about Maya, the Maghrebi people, and how I can contextualize this food. I’ll acknowledge that what I’ve learned is a mere sliver of what there is to learn about Tunisian culture and cuisine. 

I'm incredibly grateful to Maya for teaching me how to make this fabulous dish (twice!), and for allowing me to share her story and recipe with you. I hope that you make this dish and feel connected to Maya and her family. I encourage you to always contextualize the recipes you cook. Commit to honoring traditions, ingredients, and people. 

Quotes have been edited for clarity.

Maya teaching me how to make brika

Maya teaching me how to make brika

Recipe Type: Appetizers 

Time: 1.5 hours

Servings: 20 brikas

Ingredients

  • 1 small (or half large) onion diced ¼ inch pieces

  • 250 grams (one small) chicken breast diced ¼ inch pieces

  • 4 small or 3 medium starchy potatoes peeled and diced into ½ inch pieces

  • 2 eggs

  • 2 cloves minced garlic

  • 3-4 tablespoons cream cheese

  • 5 slices Gouda or Gruyere cheese 

  • 1 tablespoon harissa

  • 1 tablespoon ras el hanout

  • 1 teaspoon turmeric

  • A handful of parsley leaves roughly chopped

  • Salt and pepper

  • Neutral oil for frying (I used sunflower oil)

  • Olive oil

  • Feuille de brick (10 pieces), or Filo dough cut into 3" x 10"-ish strips

Equipment

  • 8-10 inch skillet Baking sheet with a wire rack 

  • Plate or baking sheet

  • Spoons

  • Mixing bowls

  • Small pot

  • Cutting board

  • Chef's knife and paring knife

  • Colander 

Instructions


Make the Filling

  1. Bring a small pot of water to boil, add one egg and boil for 8 minutes (set a timer). While the egg is cooking, gather your tools and ingredients. 

  2. After the egg has cooked, submerge in a bowl of cold water for five minutes. Wash the small pot and set aside. 

  3. Prepare your mise en place in the following order:

    • Peel and dice potatoes into ¼” cubes, add potatoes to the small pot with a generous pinch of salt, cover with cold water. Cook until tender. Drain with the colander and set aside in a medium bowl to cool. 

    • Chop onion into ¼” pieces, mince garlic, and roughly chop parsley. Set aside onion and parsley on a plate or small baking sheet. Put the minced garlic in the medium mixing bowl with the potatoes.

    • Lastly, chop the chicken breast into ¼” cubes. It’s easier to chop the chicken breast if you stick it in the freezer for 30-45 minutes beforehand. 

    • Clean knives and cutting board thoroughly with hot soapy water. 

  4. Heat 2 tablespoons of olive oil in a skillet over medium-high heat. Add the onions and parsley and cook until the onions become translucent. 

  5. Add the diced chicken and cook until the chicken is just cooked through. As you cook, be mindful of the heat. If you notice something is burning or cooking too quickly, lower the heat. Add oil if the chicken is sticking or if the ingredients seem too dry. 

  6. Once the chicken is just cooked through, lower the heat to medium-low, add turmeric and ras el hanout to the skillet. Cook together for a minute or so until aromatic.

  7. Remove from heat and add the chicken mixture to the mixing bowl with the potatoes. Let the mixture cool for 10-15 minutes.

  8. While the filling cools, peel the hard boiled egg and chop into small ¼”-ish pieces (I do this directly over the medium bowl). 

  9. Clean up your workstation. Wash and dry the skillet and place on the stove. 

  10. Once the chicken and potatoes have cooled, add the remaining raw egg, 1 tablespoon of harissa, salt and pepper, and cream cheese (use your hand to break into small ½ inch pieces-so that you get melty little dollops). Mix gently to combine. Taste the filling and adjust seasoning according to your preference. 

Assemble the Brika

  1. Watch the “How to Fold Brika” Video (see above).

  2. Gather your dough, if using feuille de brick rounds, cut the dough in half with scissors so that you have 20 semi-circles of dough. If you’re using filo dough, cut the dough into 3”x10”-ish strips.

  3. Cut five slices of your preferred cheese into four equal pieces so that you have 20 small pieces of cheese. If using the semi-circle, fold in half vertically so that the semi-circle becomes a strip.

  4. Place the dough so that the longer straight side is on your left and the shorter folded side is on your right side. 

  5. Add a heaping tablespoon of filling to the bottom of dough 2 inches above the bottom.

    • Fold the left corner of the dough over the filling towards the right side

    • Then, take the bottom edge of the filled dough and fold it up and to the left so that the bottom diagonal edge lines up to the left vertical edge

    • Take the left edge and fold it up and to the right to meet the right edge

    • You should see the brika slowly forming a triangle

    • Fold the triangle tightly so that the edges contain the filling

    • Continue folding in this manner until the triangle is complete

    • Trim the excess dough, and place the seam side down on a plate or baking sheet

  6. Fold all 20 pieces

Fry the Brika

  1. In the skillet, heat one inch of neutral oil to around 375℉/190℃. If you don't have a thermometer, or can't be bothered like me, simply dip a corner of the triangle into the oil and when the oil bubbles steadily and gently the heat is ready.

  2. If the oil is smoking and the corner of the brika is browning immediately, then the oil is too hot, and will burn the brika. Remove from the heat and wait for it to cool, or add room temperature oil to bring down the heat. 

  3. Once the oil is ready, gently place the brika into the oil, seam side down and fry until the first side a light golden brown. Flip the brika and fry it on the other side. Fry the remaining brika in small batches. 

  4. Remove the fried brika and drain on a baking sheet lined with a wire rack and put in 200℉/95℃ degree oven to keep warm if serving later.

  5. Continue frying in batches.

Frying Tips

  • When placing the brika in the oil, get close, and gently slide them in away from you. While it may seem scary to be close to the oil, it's actually safer than dropping in items from a distance. When you drop items into the oil, you risk oil splashing and burning you.

  • I like to spoon the hot oil over the top of the brikas to get the shape flat, and use two spoons to maneuver them.

How to Serve

Serve fresh and hot, or reserve for later and reheat them in the oven at 350℉/175℃

Enjoy the videos and music you love, upload original content, and share it all with friends, family, and the world on YouTube.