Spaghetti and Meatballs

I rarely needed to make meatballs and red sauce in NYC, but it was always a special occasion food and a weekend project to look forward to when I did. I would go to Paisano's or Fleisher's butchers to get some high-quality beef, pick up some crusty bread, and cook while listening to a podcast or NPR. I'd make the meatballs, sear them up, and finish them in a simple red sauce. Then, we'd have friends come over to tuck into the pasta.  

I was hesitant to write a recipe because I'm not Italian, and I don't want to be appropriative. But, folks reach out to request the recipe when I shared stories of it on IG. I want to be clear that this is my interpretation and instructions of a classically Italian-American dish that draws from many wonderful Italian cookbooks, chefs, restaurants, and friends. I hope to share what I've learned from these wonderful traditions and voices in a respectful and not appropriative way. The most impactful inspiration to my current version of meatballs comes from the meatballs served at Frankies 457 in Brooklyn; they're huge, juicy, and come three to a small plate piled with red sauce filled with pine nuts and raisins. I'll always remember how succulent and juicy the meatball was, how the raisins had plumped in the juices to add a touch of sweetness to each bite, and how the pine nuts added savory morsels of opulence. The version of meatballs and red sauce that I make today, in 2020, has evolved over a couple of decades of making this dish. It might be one of the foods that I first learned how to cook, a food that I have a history with, and is incredibly comforting and reminds me of friends and family. You can read part two about Spaghetti and Meatballs in the November newsletter coming out tomorrow. If you haven't already, subscribe!

This recipe makes 18 meatballs, which can serve up to six people. You can split the recipe in half. Or, cook the full recipe and freeze a portion of it for up to two-months. Thaw the sauce in your fridge overnight and reheat over medium-low heat for 20-30 minutes. I like to make the whole batch at once and eat the meatballs throughout the week in various iterations: on a sandwich with melted cheese, alongside vegetables, or with pasta.

IMG_5823.JPG

Recipe Type: Dinner/project 

Time: 2.5-3 hours

Servings: 6 servings

Ingredients

Meatballs

¼ cup pine nuts

½ cup of bread crumbs or 1½ cup of day-old bread (any kind) with crusts removed torn or cubed into 1-inch pieces

½ cup of milk

2 lbs or 900 grams of ground beef with about 10% fat 

One medium onion diced into ¼ inch pieces 

4-5 cloves of garlic finely chopped

¼ cup of chopped parsley

½ cup of golden raisins

One tablespoon zest from an orange or a lemon

Three eggs

½ cup of grated Parmesan or Pecorino cheese

One teaspoon freshly grated nutmeg

Salt and pepper 

1 cup of neutral oil for frying 

Red Sauce

One medium onion diced into ½ inch pieces

4-5 garlic cloves minced

Two 28-oz cans of whole peeled plum tomatoes

One teaspoon oregano

One teaspoon crushed red pepper

Olive oil

1-2 teaspoons granulated white sugar

Two one-pound packs of spaghetti

For serving

Finely chopped parsley

Parmesan for grating on top of the pasta

A big green salad

Equipment

Mixing bowls

Measuring cups

Chopping board/knife

Frying pan or skillet

Large pot for boiling pasta

Large heavy-bottomed pot for red sauce

Tongs

Small sheet tray

Instructions

Preparing meatballs is one of those meditative tasks that takes a little bit of practice to master. Take it easy and be kind to yourself if this is your first time making them. They're kind of like learning how to fold dumplings. The more you do it, the better and faster you'll get at making them. Think of this as an opportunity to listen to your favorite podcast or an audiobook while you're cooking. For an enjoyable time in the kitchen, set yourself up for success by reading through the instructions before cooking, preparing your mise en place, and cleaning as you go!

Toast Pine Nuts and Soak Bread Crumbs

  • Place the pine nuts on a small sheet tray and toast in a preheated 350℉ 175℃ oven and set a timer for 4 minutes at first and keep adding a minute to the time until they're lightly golden and fragrant. Keep your eye on the oven because the nuts will go from toasted to burned in seconds. Pull from the oven and let cool on a wire rack.

  • Soak bread crumbs or the cubed or torn bread into the milk in a bowl for around 5-10 minutes.

Meatballs 

IMG_5771.JPG
  • Add the ground beef to a large mixing bowl.

  • Peel two onions and toss the skins. Chop the first onion into a ¼ inch dice for the meatballs into the mixing bowl with the meat. Chop the second onion (for the gravy/sauce) into a ½ inch dice and set aside in a small bowl.

  • Mince 8-10 cloves of garlic. Add half of the garlic to the mixing bowl with the meat, and set aside the other half in a small prep bowl.

  • Mince ½ cup of parsley, add half into the mixing bowl with the meat, and reserve half in a small prep bowl for garnishing later.

  • Chop half of the raisins into smaller pieces and leave the rest whole. Add all of the raisins to the mixing bowl with the meat mixture along with one teaspoon of grated nutmeg, one teaspoon orange zest, the toasted pine nuts, two eggs, ½ cup of grated parmesan, one teaspoon of grated nutmeg, and soaked bread or bread crumbs. If you've soaked the cubed bread, crumble the bread into small pieces (the size of peppercorns) and add to the meat mixture along with the residual milk.

  • Season with one tablespoon of kosher salt (adjust to half a tablespoon if you're using table salt) and 8-10 grinds of fresh pepper (or around one teaspoon of pepper).

  • Mix the meat mixture by hand for 2-3 minutes until thoroughly combined.

  • Heat the skillet and add a ½ inch layer of oil to the bottom of the pan. Take one teaspoon of meat and form it into a little hamburger patty. When the oil heats up, fry it until cooked, and taste it for seasoning. You'll most likely need to add more salt. Make another patty and fry it to taste the seasoning, and continue doing that until seasoned to your liking. Turn off the skillet while you form the meatballs.

  • Using a ⅓ cup measuring cup, scoop ⅓ cup meat portions into your hand and tightly form into round balls. Place on a baking sheet.

  • Heat the skillet, and when the oil is hot (when you place a meatball in the oil, it should have a nice sizzle), fry the meatballs in a pan, taking care not to overcrowd the pan. Leave 2-3 inches around each meatball. Let each face of the meatball sear and get a deep brown crust. Once one part of the meat gets a crust, I like to use two spoons to gently roll the meatball onto another face of the ball to sear that side and do that until all the meatball sides are seared.

  • Getting a good sear on the meatball is crucial to adding flavor and preventing it from falling apart in the sauce. You don't need to worry about cooking the meatball all the way through because it will finish cooking in the sauce.

Sauce

  • In a large heavy-bottomed pot (I use a 7-quart Dutch oven to prevent the sauce from burning), add 3-4 tablespoons of olive oil and heat the pan. Once the oil is hot, add the reserved ½" diced onion for the sauce and cook for two minutes or until they become translucent. Then, add reserved minced garlic and cook until the garlic is fragrant and translucent (a minute or two). Take care not to brown the onion or garlic.

  • Add one teaspoon of crushed red peppers and toast for 30 seconds or so.

  • Add one teaspoon of oregano to your palm and rub your hands together over the pot to release the oils. Add the oregano to the pot.

  • Add the canned tomatoes by taking the tomatoes two at a time and crushing them and breaking them into tiny pieces with your hands over the pot. Then add the liquid from the cans and rinse out the cans with some water and add that rinsed tomato water to the pan. Add one teaspoon of sugar and a generous pinch of salt, and 3-5 grinds of pepper. Bring the sauce to a boil, then lower to a gentle simmer.

  • Simmer for 30 minutes over medium-low heat. You want the sauce to have a gentle and consistent boil. Stir it every 5 minutes or so to make sure it's not scorching or sticking to the bottom of the pan.

  • After the sauce has cooked for 30 minutes, lower the heat slightly, gently add the meatballs into the sauce and cook for 30 more minutes. Stir occasionally to make sure the sauce isn't sticking to the bottom of the pan.

  • Bring a pot of water to boil, and keep it hot on the stove over low heat. During the last 10 minutes of meatball cooking, cook the spaghetti for two minutes less than the suggested time. Before draining the pasta, save one cup of pasta boiling liquid (I use a measuring cup and scoop from the pot), then drain the spaghetti in a colander in the sink.

  • Immediately add the pasta back to the same pot plus half a cup of pasta water. Spoon in a cup or two of sauce (no meatballs) and cook the pasta, sauce, and pasta water, stirring gently together until cooked al dente. The pasta will continue cooking and absorbing the liquid.

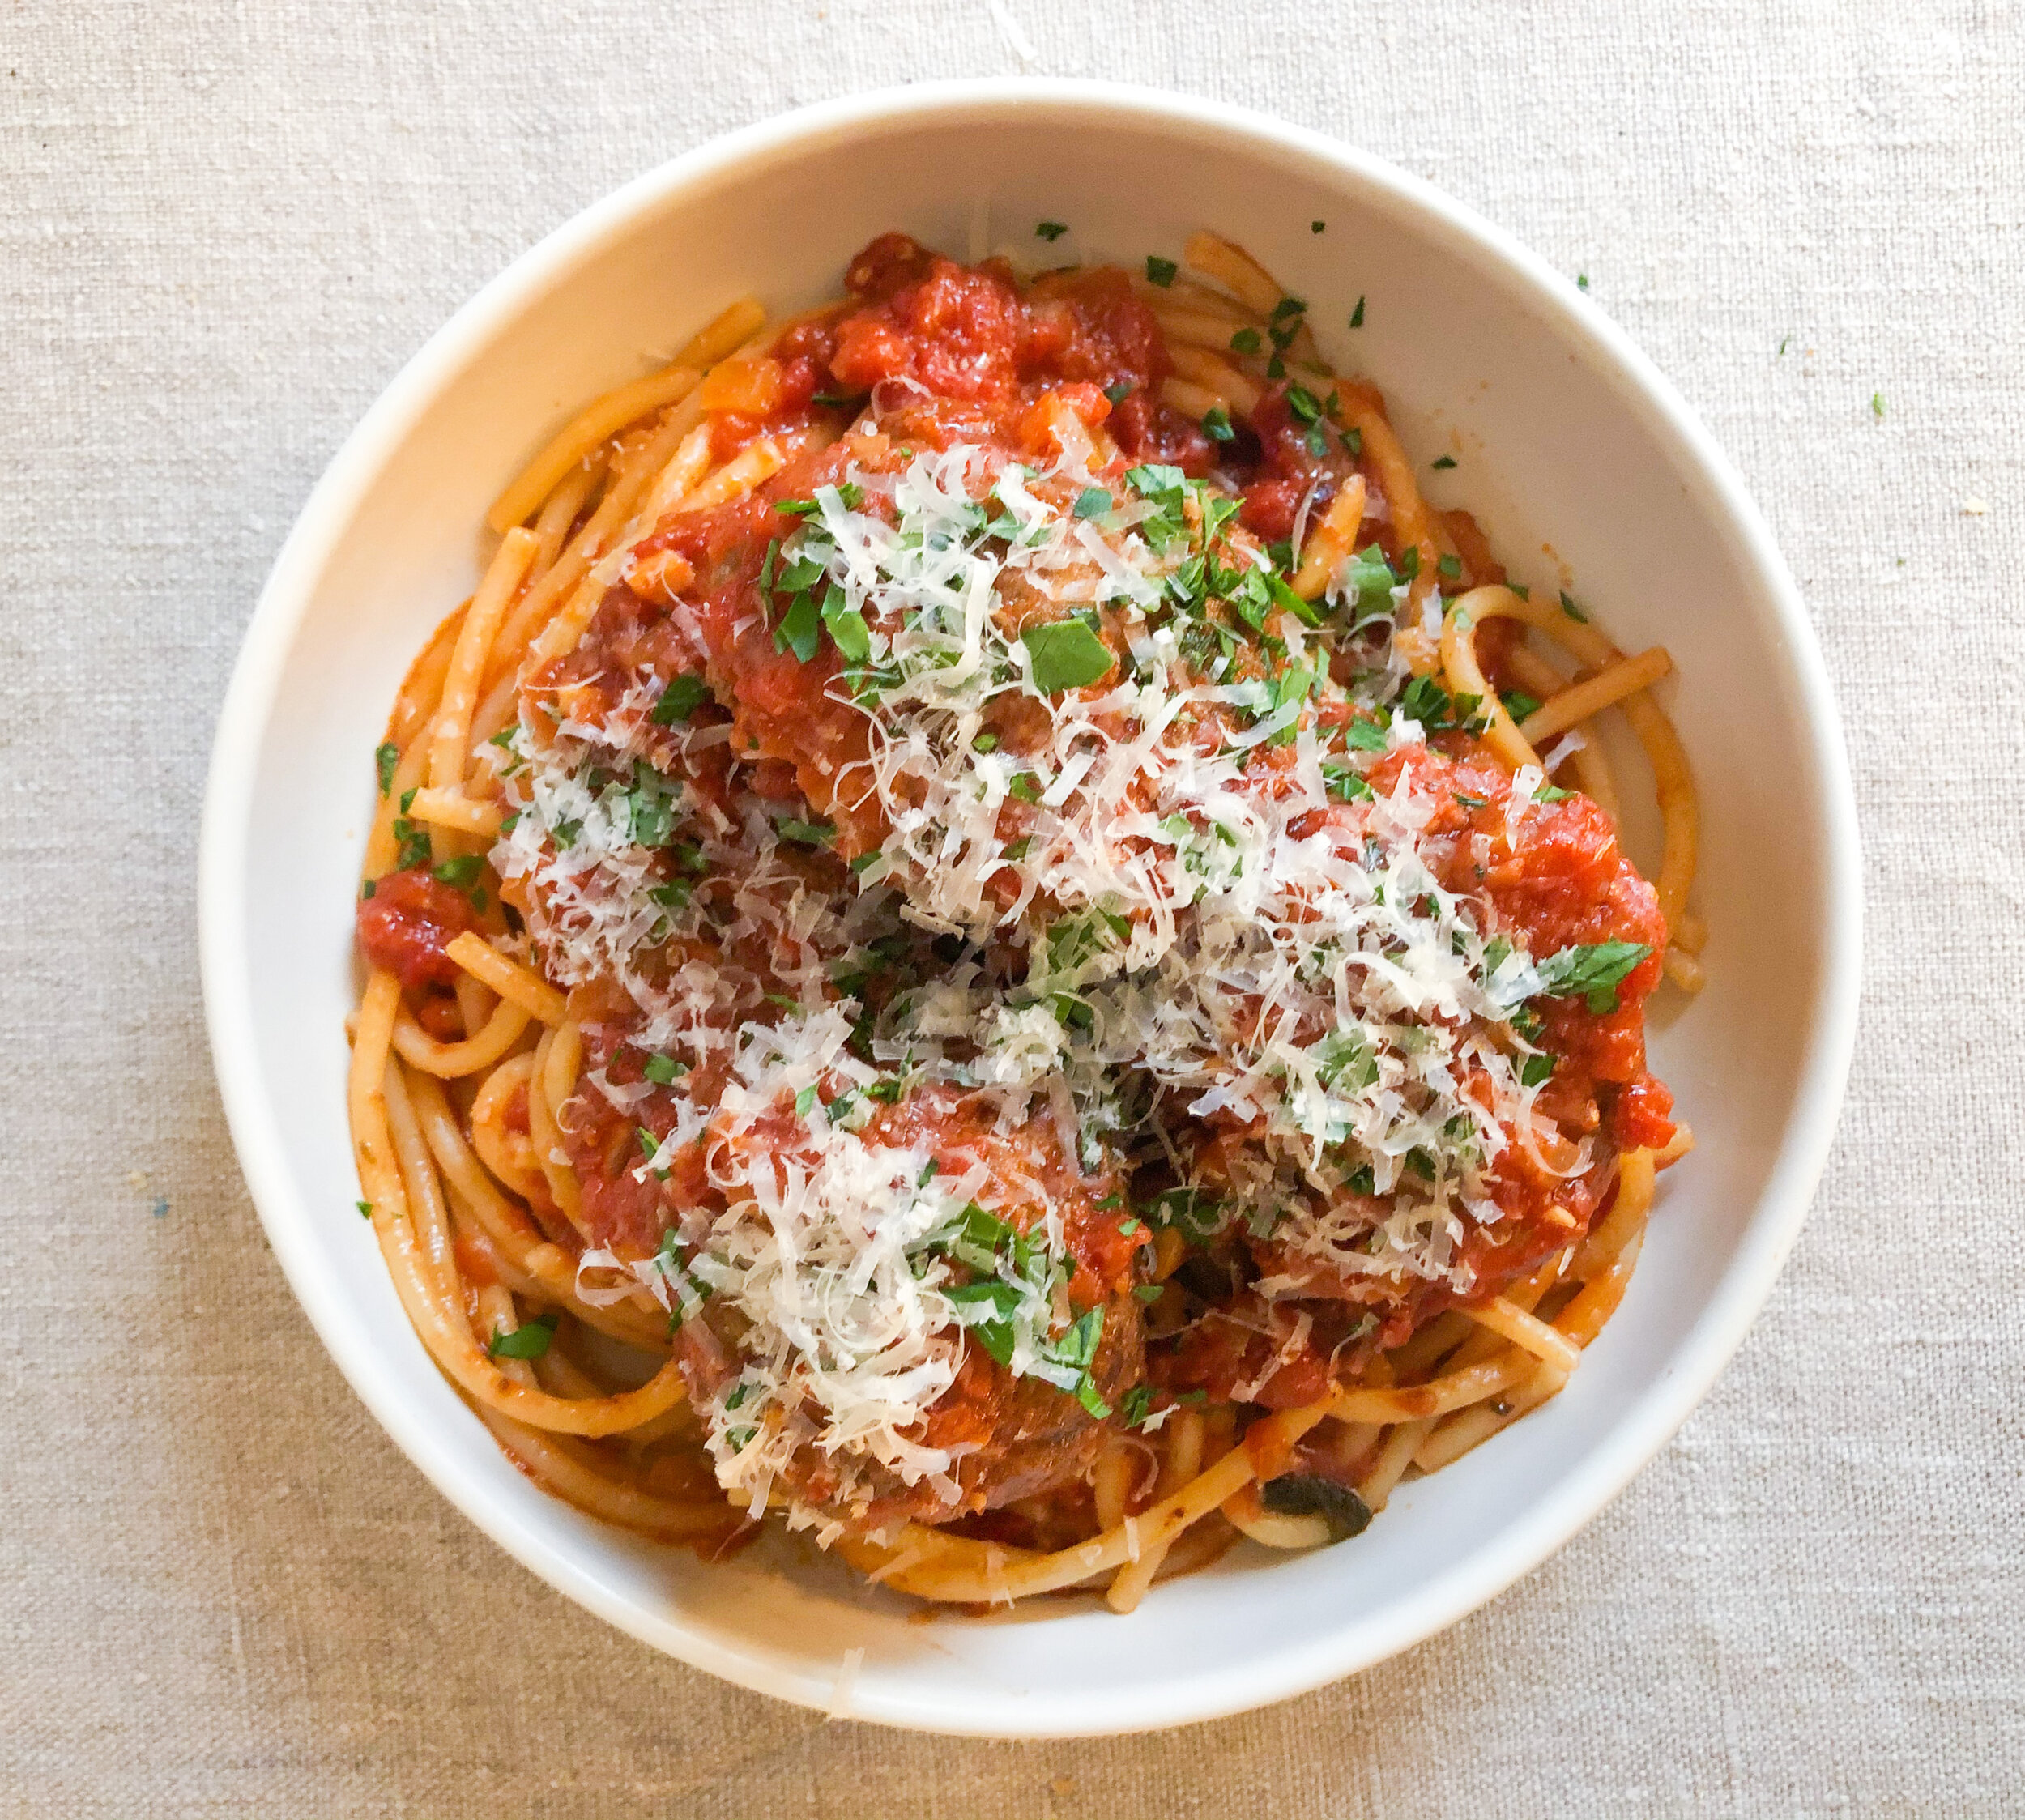
  • Add more sauce and pasta water as you need to have a nice glossy sauce. Remove from heat, add to a large pasta bowl or individual bowls. Ladle more sauce on the pasta and place the meatballs on top. Garnish with chopped parsley.

How to Serve

  • Serve family-style or in individual bowls. I like to serve three meatballs per person.

  • Serve with crusty bread and a big green salad.

IMG_5784.JPG

Salad D’automne: Roasted Fall Butternut Squash Salad 

Roasted fall butternut squash salad is a hearty, savory, and fabulously easy dinner or side dish. When cooking vegetable-forward dishes or meals, I want them to be satiating and delicious. This salad maximizes flavors and textures from the ingredients by simply roasting or boiling the main ingredients. The roasted squash and onions have concentrated flavor and umami-packed browned bits while the cooked French lentils add a creamy and hearty bite. Dill + red wine/sherry vinegar give this salad a pop of brightness, and a generous drizzle of lovely olive oil adds some luxury and opulence. Serve this salad d’automne with some crusty sourdough bread for an easy and delicious fall meal.

2020-09-16 Lentils .jpg


Recipe Type: Vegan Meal or Side

Time: 1 hour

Servings: 4 as a side 2 as a main

Ingredients

Two cups of cubed butternut squash (1 small whole squash)

½ cup French lentils (lentilles du puy)

8 small onions (such as cippolini or spring onions if available) or 1 yellow onion

A handful of fresh dill and chives (sage can be a great substitute)

1 tablespoon maple syrup

Salt and pepper

Red wine or sherry vinegar

1 clove of garlic

Neutral oil (grapeseed or sunflower)

Olive oil

Equipment

2 Baking sheets

Y Vegetable peeler

Medium or small pot

Knife and cutting board

Fine Mesh Sieve

Parchment paper

One medium or large mixing bowl

Microplane

Instructions

  • Preheat the oven to 400℉ or 205℃. Prepare the squash by cutting off the top and bottom of the squash, peel the squash with a sharp vegetable peeler, discard the peels, then cut the squash lengthwise. Scoop out the seeds (you can clean and roast them to snack on if you’d like), and dice the squash into ½ inch pieces. 

  • Toss the diced squash in 2 tablespoons of neutral oil, a generous sprinkle of salt, and maple syrup. Place on an even layer on a parchment sheet lined baking sheet and set aside. 

  • Clean the onions by removing the skins and trimming off the roots. Cut into halves or quarters if you have small onions or dice a large one into 1 inch cubes. 

  • Toss in one tablespoon of neutral oil and a generous pinch of salt. Place on another parchment paper lined baking sheet cut side down. 

  • Roast the squash and onion for about around 30-45 minutes until the squash becomes tender browns at the edges and the onions char on the edges. Give the squash and onions a stir in the middle of cooking to promote even roasting and change the position of the vegetables in the oven. 

  • Bring a medium or small pot of water to boil. When boiling, add lentils and lower to a simmer. Cook gently until the lentils are tender (around 30-40 minutes). Taste them to test for doneness.

  • When they are cooked to your liking, drain the lentils in a sieve and add them to the mixing bowl.

  • While the vegetables are roasting and the lentils are cooking, wash the dill and chives and set aside. Reserve a few dill fronds for garnish. 

  • Once the vegetables have roasted, place them into the mixing bowl with the lentils.

  • Chop the dill and chives and add to the mixing bowl.

  • Grate one clove of garlic with a microplane directly into the bowl (if you don’t have a microplane finely chop the garlic after chopping the herbs). Add two glugs of olive oil and about one tablespoon of red wine or sherry vinegar for acid. Add freshly ground pepper and season with salt to taste. 

  • Garnish with dill fronds and serve warm or at room temperature with some crusty sourdough bread. 

Cauliflower Sandwich

It's cauliflower season, and I want to be more inclusive to my vegan readers and share a fabulous sandwich that's easy to scale up or down for a quick dinner or a feast with friends. I like to roast a whole cauliflower broken into florets to concentrate the cauliflower's flavor. When roasted, the cauliflower will get browned and crispy on the edges and soft and tender in the center. Before preparing the ingredients, I make the dough for homemade chapati, a flatbread that my friend Maya taught me how to make (check out her Brika recipe). While the dough is rising, I cook the cauliflower and assemble the vegetables for the sandwich. When it's time to eat, I cook the bread, and place everything on the table to serve family style so that everyone can help themselves: a large plate of veggies for garnishing (and texture), the roasted cauliflower, warm bread, tahini dressing, olive oil, harissa, and salt/pepper. To make this sandwich into a feast, simply serve with a large green salad, houmous, and eggplant caviar/baba ganoush with some sliced carrots and cucumbers for dipping. 

In case you missed it, here’s my first monthly newsletter that went out last week. You can stay up to date on all things Le Dinner Party by subscribing!

IMG_2018.jpg

Recipe Type: Vegan, Sandwich

Time: 1 hour

Servings: 

Ingredients

1 large head of cauliflower

1 lime or lemon

2 cloves of garlic

Red onion

Cucumber

¼ head of crispy lettuce of your choice

Harissa or any other hot sauce of your choosing

½ cup of tahini

Olive Oil

Neutral oil (I use sunflower or grapeseed)

Salt and pepper 

Any combination of fresh tender herbs; I love to use dill, scallions, mint, and cilantro or parsley

2-3 pieces of flatbread for each person 

Equipment

Baking sheets

Food processor

Microplane

Instructions

Prepare Bread

If you're making homemade bread, prepare the dough before cooking the cauliflower.

Roast Cauliflower

  • Preheat the oven to 400℉ or 205℃.

  • Remove the outer green leaves of the cauliflower, and cut the cauliflower into approximately two-inch florets. I like to keep the stem and slice it into ¼ inch disks and roast them with the florets. 

  • Wash and drain cauliflower.

  • Place the drained cauliflower into a large bowl and add 2-3 tablespoons of neutral oil, a generous sprinkle of salt. Toss to coat, and place in an even layer on a baking sheet. Roast until browned at the edges and tender when pierced with a knife (20-40 minutes depending on your oven). 

  • Remove cauliflower and pour a couple of tablespoons of olive oil on top and add a splash (around 1 teaspoon) of acid red wine vinegar or lemon/lime juice. Toss to combine. When ready, place the cauliflower in a serving bowl covered in foil to keep warm. 

  • You can prepare the cauliflower ahead of time and keep warm in the oven at 200℉ or 95℃.

Mise en Place and Garnishes

While the cauliflower is roasting, assemble the rest of your ingredients and set up your mise en place. 

  • Wash lettuce and herbs.

  • If necessary, Trim dead parts off of the herbs and place onto a serving plate.

  • Cut lettuce into thin slices horizontal to the root to make shredded lettuce or shrettuce and add to a serving plate.

  • Peel the red onion and slice into half-moons, slice cucumbers into rounds or half-moons, and if you have scallions, cut into ⅛" pieces. Place on a serving plate.

  • Roughly chop 2 cloves of garlic and set aside. 

  • Roughly chop a little bit of all the herbs you're using so that you have around ¼ cup for the tahini dressing. 

Prepare Tahini Dressing

  • In a food processor, add the 2 cloves of roughly chopped garlic, and pulse a few times to mince. 

  • Add ½ cup of tahini, ½ teaspoon of lemon zest, and the juice of ½ a lemon or lime, and the chopped herbs. 

  • While running the food processor, drizzle in around ¼ cup of water (more or less depending on how loose you want your dressing) to make a silky dressing. 

  • Season with salt, pepper, and more citrus juice if you want it to be more tart. 

  • If you don't have a food processor, you can whisk the ingredients together (make sure to mince the garlic rather than roughly chop)

How to Serve

Cauliflower-Fast.gif

Before serving, heat the bread on a pan or in the oven. Place in a clean kitchen towel in a shallow bowl or plate to keep warm. Set all the veggies, herbs, and dressing, and harissa on the table to let guests assemble their own sandwiches. 

Dakjuk (Korean Chicken & Rice Porridge)

Juk is a Korean rice porridge (similar to Chinese Congee) made by simmering soaked rice until it bursts and releases its starches to make a beautiful thick porridge. There are countless varieties of Juk. My favorites are abalone juk that my aunties would make for us when we visited South Korea, and a ground rice and pine-nut version that my mom makes. Koreans make juk for breakfast or for their loved ones who are feeling sick because it is very easy to digest and comforting. Juk is gentle AF, and we all need gentle shit right now. 

I made dakjuk (dak translates to chicken in Korean) for dinner on Sunday and got some requests to post the recipe. So, here she is! My version has a soy-marinated egg with a runny yolk because j’adore eggs and I believe they are little nuggets of opulence. In addition to being a benevolent queen, I’m also a practical queen. I designed this recipe two ways: using leftovers from my Korean Glamour Chicken Soup recipe, or as it’s written. I’ve included instructions for both versions below. You’re welcome, and I hope you make this gentle beauty.

IMG_0077.JPG

Recipe Type: Comfort Food

Time: 2 hours

Servings: 4

Ingredients

2 whole raw chicken legs (thigh and drumstick attached with skin and bones)*

4-5 cups chicken stock*

1 cup short grain rice or glutinous rice 

1 scallion thinly sliced

4 cloves peeled garlic

½ onion diced into ½ inch pieces

Sesame seeds

Optional

4 eggs

½ cup soy sauce

*You can make this recipe the day after you make Korean Glamour Chicken Soup with leftover dark meat (legs and thighs) and broth.

Equipment (Heading 2)

Medium Pot

Small Pot

Various mixing bowls

Fine mesh sieve

Instructions

Soak Rice

  • Place rice into the fine mesh sieve and rinse under cold water until the water runs clear. Add to a medium bowl and cover with around 2 inches of water. Soak for one to two hours.

Prepare and Gather Ingredients

  • Peel garlic, dice onion into small cubes, and slice scallions. Set ingredients aside in small prep bowls (or whatever you have).

Prepare Eggs

  1. Bring a small pot of water to boil over high heat for the eggs. Once the water boils, lower the heat to medium until the water is boiling steadily, but not aggressively. With a spoon, carefully lower each egg into the water and boil for seven minutes. This should, in theory, yield a soft boiled egg with a runny yolk. I recommend testing one egg first to ensure that you achieve your ideal runniness of egg yolk. If your test egg is too runny, then add 30 seconds-one minute to your cook time. If it’s overcooked, then subtract 30 seconds-one minute. 

  2. Once the egg has cooked, remove the egg and place into a bowl of ice water and let sit for approximately five minutes. 

  3. Peel the eggs and place into a shallow small bowl with soy sauce to marinate at room temperature. If the soy sauce doesn’t cover the egg that is totally fine, simply rotate the egg every 15 minutes or so. 

  4. Marinate for one to two hours maximum. Otherwise the eggs will become too salty.

Cook Juk

  1. Place the chicken legs and garlic into a medium pot. Add the chicken stock and bring to a boil over high heat. Once the stock boils, lower the heat to medium-low and cook the chicken legs with a gentle simmer for an hour, or until the meat easily falls off the bone. Keep the pot covered so the chicken stock maintains its volume. The chicken legs will give off beautiful fat in the stock. Leave it. The fat is delicious chicken-y flavor.

  2. Remove the legs and let cool on a plate.

  3. If you are using leftover chicken and broth from Korean Glamour Chicken soup, you can skip the previous steps, and reheat the broth in a medium pot. Shred about one cup of the leftover dark meat (legs and thighs), discard skin and bones, and set aside.  

  4. Drain the soaked rice with the fine mesh sieve, and add the drained rice and diced onions to the pot of gently boiling stock. Adjust the heat and bring to a gentle of simmer. Stir occasionally. 

  5. When the chicken legs are cool enough to handle, shred the chicken into big pieces with your hands (or if too hot, use two forks). Toss the skin and bones. Add the chicken to the juk. 

  6. Continue cooking the dakjuk for 20-30 minutes stirring occasionally. You’ll notice the dakjuk thickening as the rice cooks longer. Towards the last ten minutes of cooking, adjust the thickness of the juk to your personal preference: To thicken, continue cooking and boil off the liquid. If the dakjuk is too thick, add water or extra stock (if you have) to loosen. 

  7. Once the dakjuk is cooked to your liking, season to taste with salt and pepper. 

  8. Ladle the dakjuk into bowls and top with sliced scallions, one soy cured egg per person (remove the egg from the soy sauce - save the soy sauce for another batch of eggs), and sesame seeds. Serve with kimchi

  9. If you have leftovers, reheat on the stove over low heat. Add some water to loosen. The juk will continue to loosen as it warms.

Le Sunday Roasted Chicken Party (Le Poulet Du Dimanche)

Roast Chicken

Roasted Potatoes with Garlic

Green Salad or Green Beans

2019-10-04 20.57.15.JPG

On Sunday, Paris slows down. It seems as if folks are choosing to prioritize themselves, their loved ones, and life. I’ve learned that Sundays are for roasting chicken (le poulet du dimanche). If you know me, you know I fuck with chicken. People are always shewk when I pull a beauty bird out of the oven. Here’s the thing though, it’s really easy to do. Go ahead, impress your guests and add this to your culinary portfolio of skills. 

The key to successful bird roasting is to dry brine — salt it the day before you plan to roast. I usually get my chicken the day before I plan to serve it, salt her, and leave her uncovered in the fridge and overnight. The dry brining process seasons the meat while drying out the skin so that it gets super crispy in the oven. When I’m ready to roast, I set the chicken on top of a bed of potatoes with whole cloves of garlic tossed in duck fat and throw her in the oven. The smell of roasting chicken filling our teeny apartment and is a cozy, luxurious, and comforting moment. 

When procuring chicken (or any meat or fish), Romaine and I prefer to eat higher quality meat less frequently. I believe it’s important to get a bird raised without antibiotics or growth hormones. We plan our meals for the week and if we know we are going to splurge on a nice chicken, we will plan more vegetable forward meals for the rest of the week. I recognize and acknowledge that my privilege in my ability to have a choice in the matter. I understand that not everyone has this luxury. In France, it’s easy to find out what kind of chicken you are purchasing. In the states, you have to do a little more research (which is bullshit—we should know what is in our supermarkets without having to do extensive research). Get the highest quality chicken that is within your price range, and do some research if you have to. The chicken that you roast is a good investment because you can freeze the carcass and save it to make chicken stock on another day (I’ll post a recipe soon for stock). 

Recipe Type: Weekend Meal, Easy

Time: 1.5 hours to roast and prep plus 24 hours to salt the chicken

Servings: 4

Ingredients

1 whole chicken of the highest quality that you can afford.

Kosher Salt

Pepper

2 lbs of fingerling potatoes scrubbed

1 lb of green beans trimmed

6-7 peeled whole garlic cloves

A couple sprigs of thyme

Equipment

Roasting pan or large cast iron skillet

1 medium pot for green beans

Instructions

Saturday Evening

2019-10-04 16.55.43.JPG
  1. Put around 2-3 tablespoons of kosher salt into a small bowl. Take chicken out of the packaging and wipe carefully with paper towels (no need to rinse). Salt the outside and inside of the chicken liberally over the sink so that you keep the raw chicken moments as contained as possible. 

  2. Place the chicken on a plate uncovered in your fridge breast side up. Refrigerate for 12-24 hours. This process is known as dry brining - for more information read this guide by Serious Eats.

  3. Wash your sink thoroughly with soapy hot water. 

Sunday evening (1-2 hours before you plan to roast your bird)

  1. 1-1.5 hours before roasting Pull the chicken out of the fridge and let it come to room temperature. 

  2. 30 minutes before roasting - wash your potatoes, strain them, and set into the bottom of the roasting rack. Add the whole garlic cloves. Drizzle with 1-2 tablespoons of fat (preferably duck fat if you have, or olive/grape seed oil). Season with salt. 

  3. 15 minutes before roasting - preheat oven to 400℉ or 200℃

  4. When ready to roast, set the chicken on top of the potatoes. Add a sprig of thyme into the cavity of the chicken and add the rest to the potatoes. 

  5. Roast chicken in the oven for around 1 hour until cooked through (about 165 degrees F or 74 degrees C). This will depend on the size of your chicken. Rotate the chicken in the oven halfway through cooking to ensure even cooking. 

  6. When cooked through, pull out of oven and let rest for 10 minutes. 

How to Serve

After the chicken has rested, carve the chicken and serve with potatoes and whole garlic cloves.

Serve with boiled green beans or a salad with a simple vinaigrette (one part lemon juice, one part oil, salt/pepper — a teaspoon of Dijon mustard optional)

Timeline for Preparing

Friday or Saturday AM

Go grocery shopping

Saturday 6pm 

Salt chicken 

Sunday 7pm dinner

  • 4:45 pm pull chicken out of fridge to come to room temperature 

  • 5:30 pm - preheat oven

  • 5:45 pm stick chicken in the oven 

  • Wash salad greens and prepare vinaigrette or start boiling water for green beans

  • 6:45 pm - check on chicken and pull out of oven if ready 

Korean Glamour Chicken Soup

Romaine and I moved out of our Brooklyn apartment at the end of August and moved into our Paris apartment two weeks later — in September. While eating out in Paris is fabulous, it is also decadent…too decadent. By the end of our two nomadic weeks, we were both fighting colds and craving home cooked food. This glamour chicken soup is the first meal I made for us in our new Paris apartment because it’s easy, satisfying, and incredibly comforting. It’s a version of the soup my mom used to make for our family that I’ve made countless times over the years. Romaine and I visited a Korean grocery store and bought some ponytail cabbage kimchi, sesame oil, and rice before we picked up the keys for our new place. I hope this chicken soup brings you as much comfort as it did for me in my first few weeks in Paris.

Recipe Type: Comfort Food

Time: 1-2 hours

Servings: 4-6

Ingredients

1 whole (glamour) chicken

1 onion

3 scallions whites and greens cut into ¼ inch slices

4 inch piece of ginger peeled and cut into 2 pieces

6-10 cloves of peeled garlic (depending on how many cloves you want to peel)

2 teaspoons of sesame oil

Salt and Pepper 

Instructions

2019-09-08 Chicken Soup Prep.jpg
2019-09-08 Chicken Soup Pot .jpg
  1. Prepare your ingredients: peel the garlic cloves, peel the onion and cut in half making sure to keep the root tact to keep the onion half together, peel and cut ginger into two pieces.

  2. Place the pot near the sink and remove any stray feathers and giblets that may be left on the glamour chicken. Rinse the bird carefully in the sink and drain well with paper towels and then place her into the pot. Make sure to thoroughly sanitize and clean any areas the chicken may have touched!

  3. Add garlic, onion, ginger and add enough water to submerge the glamour chicken 2-3 inches (about 6-10 cups of water depending on the size of your chicken/pot).

  4. Place the pot on the stove over high heat until the whole pot comes to a boil. Once boiling, lower heat to medium low so that the liquid has a gentle rolling boil. Keep the lid slightly ajar on the pot. 

  5. Boil the chicken for about an hour and a half for a smaller chicken (2-3 lbs) and around two hours for a larger bird (4-6 lbs). Check the bird every 20 minutes or so and skim the fat off the top of the broth as it cooks and add more water if too much evaporates. You want to cook the chicken enough to get a beauty-beige broth without overcooking the breast meat. 

  6. Once the beauty-broth and bird are cooked, carefully pull the chicken out of the broth and place on a plate to chill out for 5-10 minutes before chopping up and serving. Strain the broth with a colander to remove the aromatic vegetables. 

  7. Prepare the dipping sauce by adding 1 teaspoon of salt, a couple grinds of black pepper and drizzling 1-2 teaspoons of sesame oil

How to Serve

Serve each person with a piece of chicken, steamed Steamed Korean Rice and My Mother’s Kimchi (or store bought ponytail radish kimchi in a pinch like me). Both recipes can be found in Le Kimchi Party!

Guests should add sliced scallions to the soup and add salt/pepper to taste.

Dip pieces of chicken in the sesame/salt sauce and enjoy!

Soup will keep in the fridge for 3 days. Make sure to bring to a full bowl before eating leftovers. If you have extra broth, simply freeze and use as stock in the future.